Showing posts with label 00n3 gauge. Show all posts

Sunday, 3 April 2022

Castlederg and Victoria Bridge Tramway Beyer Peacock 2-4-0T

© 2022 David Hurst All Rights Reserved

The creation of this model started as a challenge to me to create a 3D printed chassis as well as an engine body. I picked the Beyer Peacock 2-4-0T as it worked well with the motor, gears, and wheels I had selected for the job. Over time and several versions of the model it evolved and I got one to work with a Halling motor bogie as a temporary chassis. This was taken to a meeting at the Oldham 009 group in November 2021 where it ran on Paul Titmuss’ 00n3 layout Wood Brook.


It was suggested that it would be a good idea to work up a copy of the Castlederg and Victoria Bridge Tramway Beyer Peacock 2-4-0T but with motion covers and frames on both sides to allow the use of the Halling chassis. With a lot of help from Paul and the 00n3 group, a 3D model was drafted based on the original and confirmed as looking correct. The idea behind this model is to offer to modellers a tempting introduction to the 00n3 gauge.

This also turned into a challenge for a friend who runs a small 3D printing business Thingymaker to see if he could produce a print to compete with Shapeways. This is a challenge that has for several years eluded him. I had a pair of prints produced by Thingymaker and Shapeways. These were both in acrylic resin but using two different processes, so they are not exactly alike, but the level of detail is good and sharp on both prints. Both do take a bit of preparation to make ready for finishing in different ways.

© 2022 David Hurst All Rights Reserved

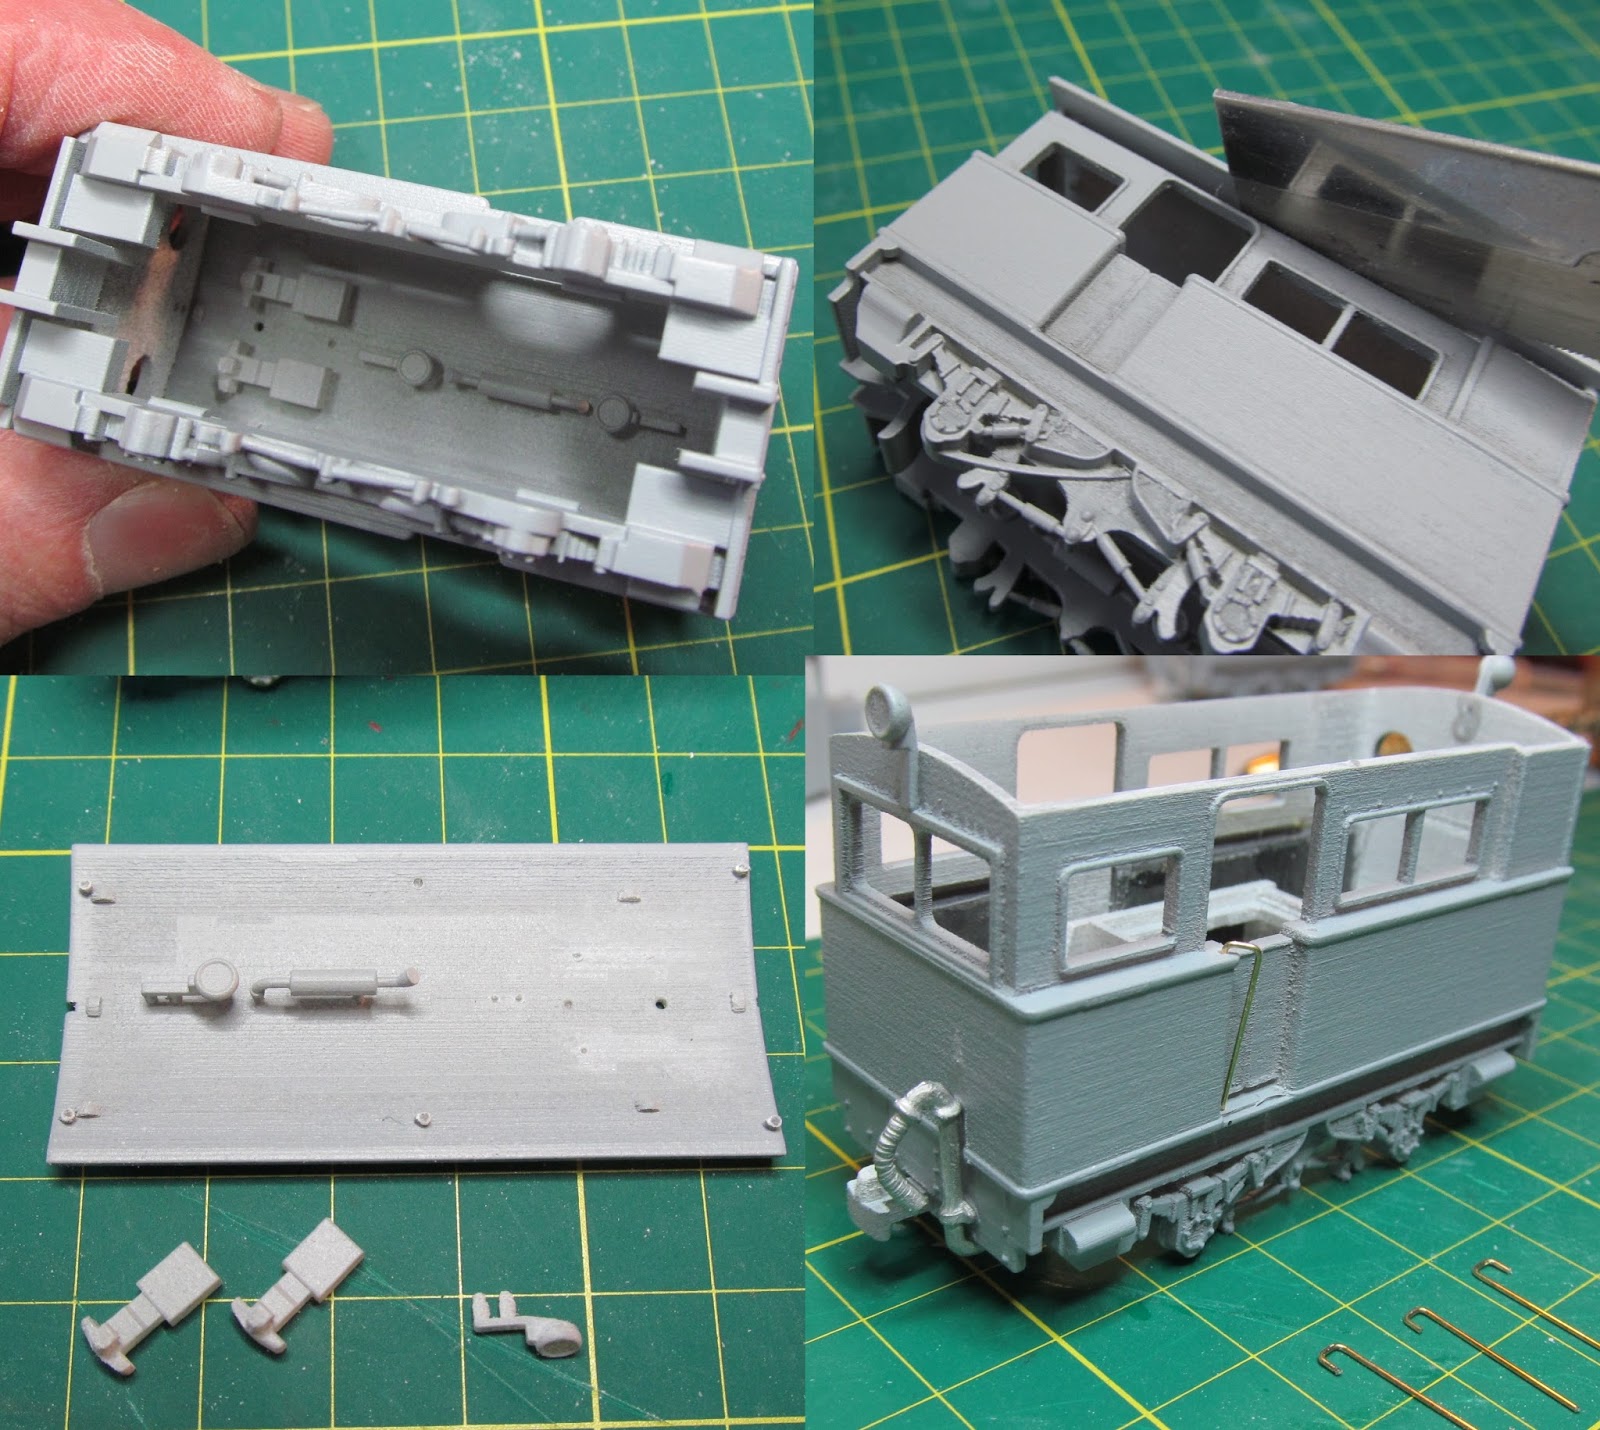
The Shapeways print in Fine Detailed Plastic, as usual, needs the wax support residue removed and a fair bit of surface residue removed from some of the print faces before priming and adding details. But this is as we expect form this material. The Thingymaker print is supported on sprues and they are tightly packed inside the print, so a bit of careful removing is needed to avoid breaking anything off the model. There is also some work to do on the internal surfaces of the print to remove some areas where the resin domes as it finishes printing, a bit like surface tension on a liquid surface. This is a little bit fiddly on some of the smaller parts but not insurmountable


I have developed the model to print in several parts, a bit like an “Airfix” kit, we have the main body, the upper cab and the front bogie are the main pieces. Details parts such as the sandboxes, smoke-box door, funnel, bell dome, and safety valves, Westinghouse pump, toolbox, water tank filler caps, air cylinder, and boiler fittings are separate for ease of finishing and adding more details.


© 2022 David Hurst All Rights Reserved

There are also several other small parts that I have added. Cab handrails formed in 0.45mm brass wire, pilot holes are formed in the bodywork for these, a brass whistle by Markits, brass grab rails on the boiler using short handrail knobs, and wire again by Markits. Pipework from the boiler fittings to the cab in soft 1mm steel armature wire. I also used this to make the coupling hooks mounted on the front bogie and under the rear buffer beam. This was obtained from a jewellery craft supplier on eBay and is soft and pliable.

© 2022 David Hurst All Rights Reserved

To create the bogie pivot a 12BA cheese head machine screw was used with a couple of washers, one under and one over the bogie frame. The thread was screwed straight into a tight hole drilled in the bodywork where a pilot whole marks the location to drill. The wheel set on the bogie was from a Tralee and Dingle Railway van by Dundas Models. The axles were slightly shortened with a file, turned down in an electric drill to give a clearance fit in the V pockets of the bogie frame, and retained by some 0.45mm wire slotted in holes under the axle in the frame. A small amount of sheet lead was added to the top of the bogie frame to give it a bit of weight, and help it to run better. Lead sheet was also added to the tank sides above the motion cover frames on each side of the body, which seemed to add enough weight to give the model reasonable traction.


A pair of white metal vacuum hoses were carefully reshaped to work on the front and rear of the model. The front one is flat and sitting on top of the buffer beam, the hose retained to the right side viewed from the front. The rear one sits to the left side of the buffer beam viewed from the rear, with the pipe bent towards the coupling hook then under the beam. These can also be done with armature wire of about 1mm diameter.

© 2022 David Hurst All Rights Reserved

When painting the model, I gave it a few coats of grey spray primer. Most of the parts are painted separately and added to the model when dry.

The crimson lake I worked with is a mixed colour using Humbrol gloss 20 maroon and a bright matt red Revel M36, the same one I used for the buffer beams. This is toned down on a second coat with the addition of a Revel red-brown matt 37M to the mix which takes most of the shine away but leaves a matt to a satin finish.

I have then dry brushed on some Revel 9M charcoal black to highlight the rivets and shadows on the model. The 9M charcoal black is also used on the foot pate, motion frames, roof, bogie, and smokebox areas. Some parts are highlighted using a mix of the black and silver (gunmetal). Areas like the bogie axles boxes, cab steps, smokebox door handles and hinges, Westinghouse pump, pipework, and handrails all benefit from this.

© 2022 David Hurst All Rights Reserved

The models had their first outing at Narrow Gauge North in March 2022 and were displayed on Paul Titmuss' layout Wood Brook. This is where the pictures show them running.


© 2022 David Hurst All Rights Reserved


I would like to thank the 00n3 group of the 009 society for all their help in producing this model.


This is a list of items and supplier used on the model

3D Printed Body 
Model Engine Works at Shapeways

Also through Thingymaker a UK based printer


1-Halling Motor Bogie ref Verio 4W Drive H0m   Supplers: Halling Modelle

ref Verio 4W Drive H0m

IDANT-VAR-HOM-DG 9mm SD wheels


2-Bogie wheel set Dundas Models


Mosskito 8.0mm metal wheels – solid disc DW86

12mm gauge

Vale of Rheidol Vacuum & Heating Pipes DP03

Short on rear & long on front


3-Small metal parts Wizard Models Limited

RM10: Medium Handrail Knobs (Pack 12)

AG04: Short Handrail Knobs (Pack 25)

ebay suppliers

0.45mm Brass wire (pack off 10 handrail wire)

0.7mm Brass wire (pack off 10 modelling wire)


BA Brass Cheesehead Screws, Nuts & Washers(20pk) BA 12 BA


200 x 30cm x 0.9mm Steel Armature Frame Wire

Galvanised for Jewellery, Modelling


4-Company Crest

The C & V.T. crest was printed on a home inkjet printer

using a Image imported into a word document and sized to suite.

Decals can be supplied by Custom Model Decals

Sunday, 29 April 2018

Atkinson Walker Steam Tractor

The Atkinson Walker Steam Tractor from the Clogher Valley Railway

2020 Updates added

©  2018   David Hurst     All  Rights Reserved 

History 

Built by Atkinson-Walker Wagons Ltd of Preston in September 1928 as one of their Class A.3 vertical boiler steam engines. Only a small number of 3ft gauge engines were built, most being of standard gauge. Engine Number 111 was acquired by the Red Lake Tramway in Devon, 114 was sent for trial at the Clogher Valley railway (which I have based this model on). Both were built and supplied at roughly the same time and two further engines were exported.
The Red Lake engine seems to have had a very different story to the Clogher Valley engine. Reported as a good engine, it worked on a Dartmoor tramway which served a china clay pit for its final 5 years before the pit's closure in 1933. This is a contrast to the short trial by the Clogher Valley Railway, in which it was found to be totally unsuitable.
By the end of 1929, Atkinson-Walker Wagons Ltd had gone out of business, and no buyer was to be found for the Clogher Valley engine, which lay idle at Aughnacloy coach and wagon shed until 1932. It was bought by Henry Forbes for the County Donegal Railway and converted at the Great Northern Railway’s Dundalk workshop to diesel power. It was fittingly renamed the “Phoenix” and worked on the County Donegal Railway until its closure in 1959. The Phoenix can now be seen in the Ulster Folk and Transport Museum.


©  2018   Paul Titmuss   All  Rights Reserved 

Model Scales 

This is an unusual looking engine and makes a good subject to model for a narrow-gauge railway. It may not have skirts but the amount of detail at each side of the footplate does a good job of hiding whatever chassis is used. The initial model was drawn up in 4 mm scale to suit the Halling motor bogie at either 12mm gauge for 00n3 or 9mm gauge for 009. 
 A further version is being produced to suit the Kato 11-104 chassis in 009 has a slightly reduced overall size to help it to blend in with the 9mm track and not look too top-heavy. 
It will be available in both 00n3 and 009 versions to print on Shapeways in Frosted Ultra Detail. If a suitable chassis can be found it is planned to make it available in TTn3 3mm scale also. 
With Frosted Ultra Detail it is advisable to soak in (Petroleum organic solvent – paint thinners) in order to remove the wax support residue left from printing, then a wash in warm soapy water should leave the surface ready for painting after it is fully dried. I use a grey or white spray primer to prep the model for finishing. In some areas, it will be necessary to remove print lines from the surface, and this can be done with a burnishing tool - I use a hardwood stick with a rounded point to get in the tight spaces. By doing these processes before separating the print into its component parts you will be less likely to lose any of the small pieces.  
I have designed the bodywork and footplate in one, with the roof removable to allow for interior details and ballast to be fitted. Two work lamps, some steps and a pair of couplings are printed within the main body of the loco. These all need to be removed before the chassis is fitted.   

©  2018   David Hurst     All  Rights Reserved 

Ballast 

There are recesses in the sides of the cab openings which I have filled with lead sheet.
This should give sufficient weight to the engine for traction and electrical pickup. 


Fitting the chassis 

With the Halling chassis, it is a straight forward fit between the two pressure plates front and back. It may be necessary to file a small amount off the inside of these plates or add a shim on so you get a snug fit, but this depends very much on the printing process and is difficult to predict. The wheels will need to be adjusted to suit the model, only one wheelset needs moving into the centre, the chassis will then be off set back to front on the model. 

©  2018   Paul Titmuss     All  Rights Reserved

The Kato chassis will need to be cut down to fit, the coupling mounts need to be cut off each end and also the axle boxes will need to be removed from the sides.  

©  2018   David Hurst     All  Rights Reserved 

Wire-work 

There is not a great amount of wire-work on this model; just the handrails each side of the cab door openings. For this, I have used 0.45 mm brass wire and drilled out the pilot holes to a little deeper to suit the wire. 


©  2018   David Hurst     All  Rights Reserved 

On the 00n3 model, the wire from the handrail was taken down to form the supports on the steps, this was done by drilling through the footplate and making the wire for the handrail long enough to be bent under the steps also.
Sanding feeder pipes were also added under the sandboxes and bent back towards the wheels.

©  2018   Paul Titmuss   All  Rights Reserved 

Couplings 

A pair of printed couplings are supplied with the models. On the 00n3 they are printed under the footplate while on the 009 they are printed under the roof, along with the other small detail parts such as the steps and work lamps. For the prototype models, We have used Greenwich type couplings on both the 00n3 & 009 versions.  

©  2018   David Hurst     All  Rights Reserved 

Glazing interior details 

For the windows I have used thin acetate saved from old packaging which is glued with a contact adhesive or Cyanoacrylate glue (super glue) and is great if you have curved or awkward shaped glazing, being thin and flexible to use. I fit the glazing when building the model, and then fix it in place in the final stages after the painting is completed, and before any weathering is done.   

Painting 

After initial preparation of the model, it was given a couple of light coats of matt grey primer, then burnished and smoothed, with a final coat of primer to finish off. As the Clogher Valley engine was never given a paint finish, we can do what we feel is right for our individual layouts. I chose to do the footplate, roof lower buffer beam and handrails, in a charcoal grey Revel No 09.
I dry brushed a little silver around the mechanical parts under the footplate which highlights the details; also some gloss varnish gives the impression of oil on these areas. Leaving the grey as the body finish. The upper buffer beams have been painted in a red mixed with dark grey.The impression of general dirt and grime was added to some areas of the bodywork, footplate, and buffer beams roof and running gear with a dry-brushed application of Revel Matt No 43 grey and No 87 grey/brown mixed.The final little bit of detail was to add the work lamps and lenses. For these I used 4mm Clear Rhinestones, fitted after the painting was completed.The steps can be added to each side of the cab when the detail under the footplate is completed this makes it a much easier and neater job 009 models only. On the 00n3 model, the steps are printed as part of the footplate.I finished overall areas with a coat of matt varnish. I then added weathering with powdered wax pastels, using mixes of brown and black, to give the engine an overall weathered and unused appearance. 


In early 2020 Kato introduced there new and updated versions of their popular 11-103 and 11-104 chassis, these are now phasing out and being replaced by the 11-109 and 11-110. With this change, I have made some simple alterations to my models using these chassis.


©  2018   David Hurst     All  Rights Reserved 

©  2018   David Hurst     All  Rights Reserved 

©  2018   Paul Titmuss   All  Rights Reserved 

©  2018   David Hurst     All  Rights Reserved 


If you would like a copy of this model it is available on Shapeways at Model Engine Works:


Thursday, 30 November 2017

Phoenix


The C.D.J.C. Phoenix Diesel:

2020 Updates
©  2017   David Hurst     All  Rights Reserved


A Brief History

Built by Atkinson-Walker wagons Ltd of Preston in September 1928 as one of their Class A.3 engines. After a short trial by the Clogher Valley Railway, it was found to be totally unsuitable. By the end of 1929 Atkinson-Walker wagons Ltd had gone out of business, and with no buyer to be found the engine lay idle at Aughnacloy coach and wagon shed until 1932. It was bought by Henry Forbes for the County Donegal Railway and converted at the Great Northern Railway’s Dundalk workshop to diesel power. It was fittingly named the “Phoenix” and worked on the County Donegal Railway till its closure in 1959. It can now be seen in the Ulster Folk & Transport Museum.


Model Scales

This is an unusual engine both for its looks and how it came about, and makes a very suitable subject to model for a narrow gauge railway. It may not have skirts but the amount of detail at each side of the footplate does a good job of hiding whatever chassis is used. The initial model was drawn up in 4 mm scale to suit the Halling motor bogie at either 12mm for 00n3 or 9mm for 009.


©  2017   David Hurst     All  Rights Reserved
A further version being produced to suit the Kato 11-104 chassis in 009, this has a slightly reduced overall size to help it to blend in with the 9mm track and not look too top-heavy.
I have made it available in both 00n3 and 009 versions to print in Frosted Ultra Detail. It should also be possible to print in Strong and Flexible if required. If a suitable chassis can be found it is planned to make it available in TTn3 3mm scale also.

With Frosted Ultra Detail it is advisable to soak in “White Sprits” (Petroleum organic solvent – paint thinners) in order to remove the wax support residue left from printing, then a wash in warm soapy water should leave the surface ready for painting after it is fully dried. I use a grey or white spray primer to prep the model for finishing. In some areas, it will be necessary to remove print lines from the surface, and this can be done with a burnishing tool - I use a hardwood stick with a rounded point to get in the tight spaces. Do these processes before separating the print into its component parts so you will be less likely to lose any of the small pieces.


I have designed the bodywork and footplate in one, with the roof removable to allow for interior details and ballast to be fitted. A small exhaust and silencer, two work lamps and a pair of couplings are printed within the main body of the loco. These all need to be removed before the chassis is fitted. 

©  2017   David Hurst     All  Rights Reserved
Ballast
There are recesses in the sides to front and back of the cab openings which I have filled with lead sheet, at the front end (with the square windows) I have also added lead under the windows. This should give sufficient weight to the engine for traction and electrical pickup.

©  2017   David Hurst     All  Rights Reserved
 Fitting the chassis
With the Halling chassis it is a straight forward fit between the two pressure tabs front and back. It may be necessary to file a small amount off the inside of these tabs or add a shim on so you get a snug fit, but this depends very much on the printing process and is difficult to predict. The Kato chassis will need to be cut down to fit, the coupling mounts need to be cut off each end and also the axel boxes will need to be removed from the sides. I have added two small lead weights at each end of the chassis glued in place - this is not totally necessary but does keep the ballast low on the model.
©  2017   David Hurst     All  Rights Reserved
Wire-work
There is not a great amount of wirework on this model; just the handrails each side of the cab door openings. For this, I have used 0.45 mm brass wire and drilled out the pilot holes to suit. They are, however,  not straight: the tops are turned to 45° outward, this makes them look straight when they are viewed side-on. See picture which may explain this better. 
©  2017   David Hurst     All  Rights Reserved
Couplings
A pair of printed couplings are supplied with the models. On the 00n3 they are printed under the footplate while on the 009 they are printed under the roof, along with the other small detail parts such as the exhaust and work lamps. For the prototype models, I have used one printed and one Greenwich type coupling on the 00n3, and both printed on the 009 versions.

©  2017   David Hurst     All  Rights Reserved
Glazing interior details
For the windows I have used thin acetate saved from old packaging which is glued with a contact adhesive and is great if you have curved or awkward shaped glazing, being thin and flexible to use. I fit the glazing when building the model, and then fix it in place in the final stages after the painting is completed, and before any weathering is done.  
Vacuum pipes
These are white metal from a Vale of Rheidol coach; supplied in sets by Dundas Models. I used two of the smaller one on these models.
Painting
After initial preparation of the model it was given a couple of light coats of matt grey primer then burnished and smoothed, with a final coat of primer to finish off. A base coat of matt white was applied before the cream was added (the grey is too dark for a cream base coat). After this had time to dry I used a mix of Revel No 36 red and No 331 red burgundy on the lower part of the body. The cream on the upper bodywork was a mix of No 5 white and No15 yellow. The footplate, roof, handrails, lamps and windows were all done in a charcoal grey No 9. I dry brushed a little silver around the mechanical parts under the footplate which highlights the details; also some gloss varnish gives the impression of oil on these areas. The impression of rust was added to some areas of the footplate, buffer beams and running gear with a dry-brushed application of Revel No 37 and No 85.  
I have printed the C.D.J.C. logo on photographic semi-gloss print paper, which has allowed me to size and print to suit 4mm scale, and have then fixed it to the model with Cyanoacrylate (super) glue. The print is sealed with a coat of matt varnish which softens the edges fix the print and helps bond it to the finished model.
Graphic details
I have used 2mm white lettering for the “PHOENIX” name; these are from Fox Transfers ref F-G1003 Franklin Heavy 2mm & 1mm. With the aid of a piece of masking tape which had index marks for each letter I was able to place the individual letters straight and at the correct spacings on both sides of the cab, the “OE” arrangement being the fiddliest as the “O” is cut vertically and joined to the front of the “E”. The other point to note is that there are only two letter X’s on the Fox transfer sheet. As I was making two models this left me two short. I overcame this shortfall of letters by cutting the bottom leg of two of the Y’s and joined them together one part upside down.

©  2017   David Hurst     All  Rights Reserved
The number 11 plates on the upper cab sides were drawn to scale and I asked Narrow Planet to produce a pair of these brass-etched plates for each model. After painting the background in a matching red to the lower bodywork, the number plates were added to each side of the cab, fixed in place with the Cyanoacrylate (super) glue.   

©  2017   David Hurst     All  Rights Reserved
After adding the decals number plates and logos, the final little bit of detail to add was the work lamp lenses. For these I used 2mm Clear Rhinestones, fitted after painting was completed.
©  2017   Paul Titmuss     All  Rights Reserved
I finished overall areas with a coat of matt varnish. I then added weathering with powdered wax pastels, using mixes off orange, brown and black, to give the engine an overall weathered and well- used appearance.  

©  2017   David Hurst     All  Rights Reserved

In early 2020 Kato introduced there new and updated versions of their popular 11-103 and 11-104 chassis, these are now phasing out and being replaced by the 11-109 and 11-110. With this change, I have made some simple alterations to my models using these chassis.
 If you would like a copy of this model it is available on Shapeways at Model Engine Works: