Friday 22 December 2017

009 Tram Coach


Additional notes added August 2019


©  2017   David Hurst     All  Rights Reserved
This is a small tram-style coach based on the Clogher Valley Railways coaches but without the clerestory roof.
The original Clogher Valley coaches were built in 1886 by The Metropolitan Railway Carriage and Wagon Co of Birmingham. There were 13 passenger coaches in total, numbers 7-9 bogie 1st class which were shorter than the others, 10 & 11 bogie 1st / 3rd composite, 12 – 19 bogie 3rd. All the coaches had balconies at each end, which supported the overhanging clerestory style roof. Communication between each coach was possible across metal fall-plates which covered the buffer-couplings. The carriages were innovative in using exhaust steam to provide heat to their passengers, at a time when the best most people could expect in winter was a warming pan. The coaches remained in service till the lines closure on New Year’s Day 1942.  

©  2017   David Hurst     All  Rights Reserved
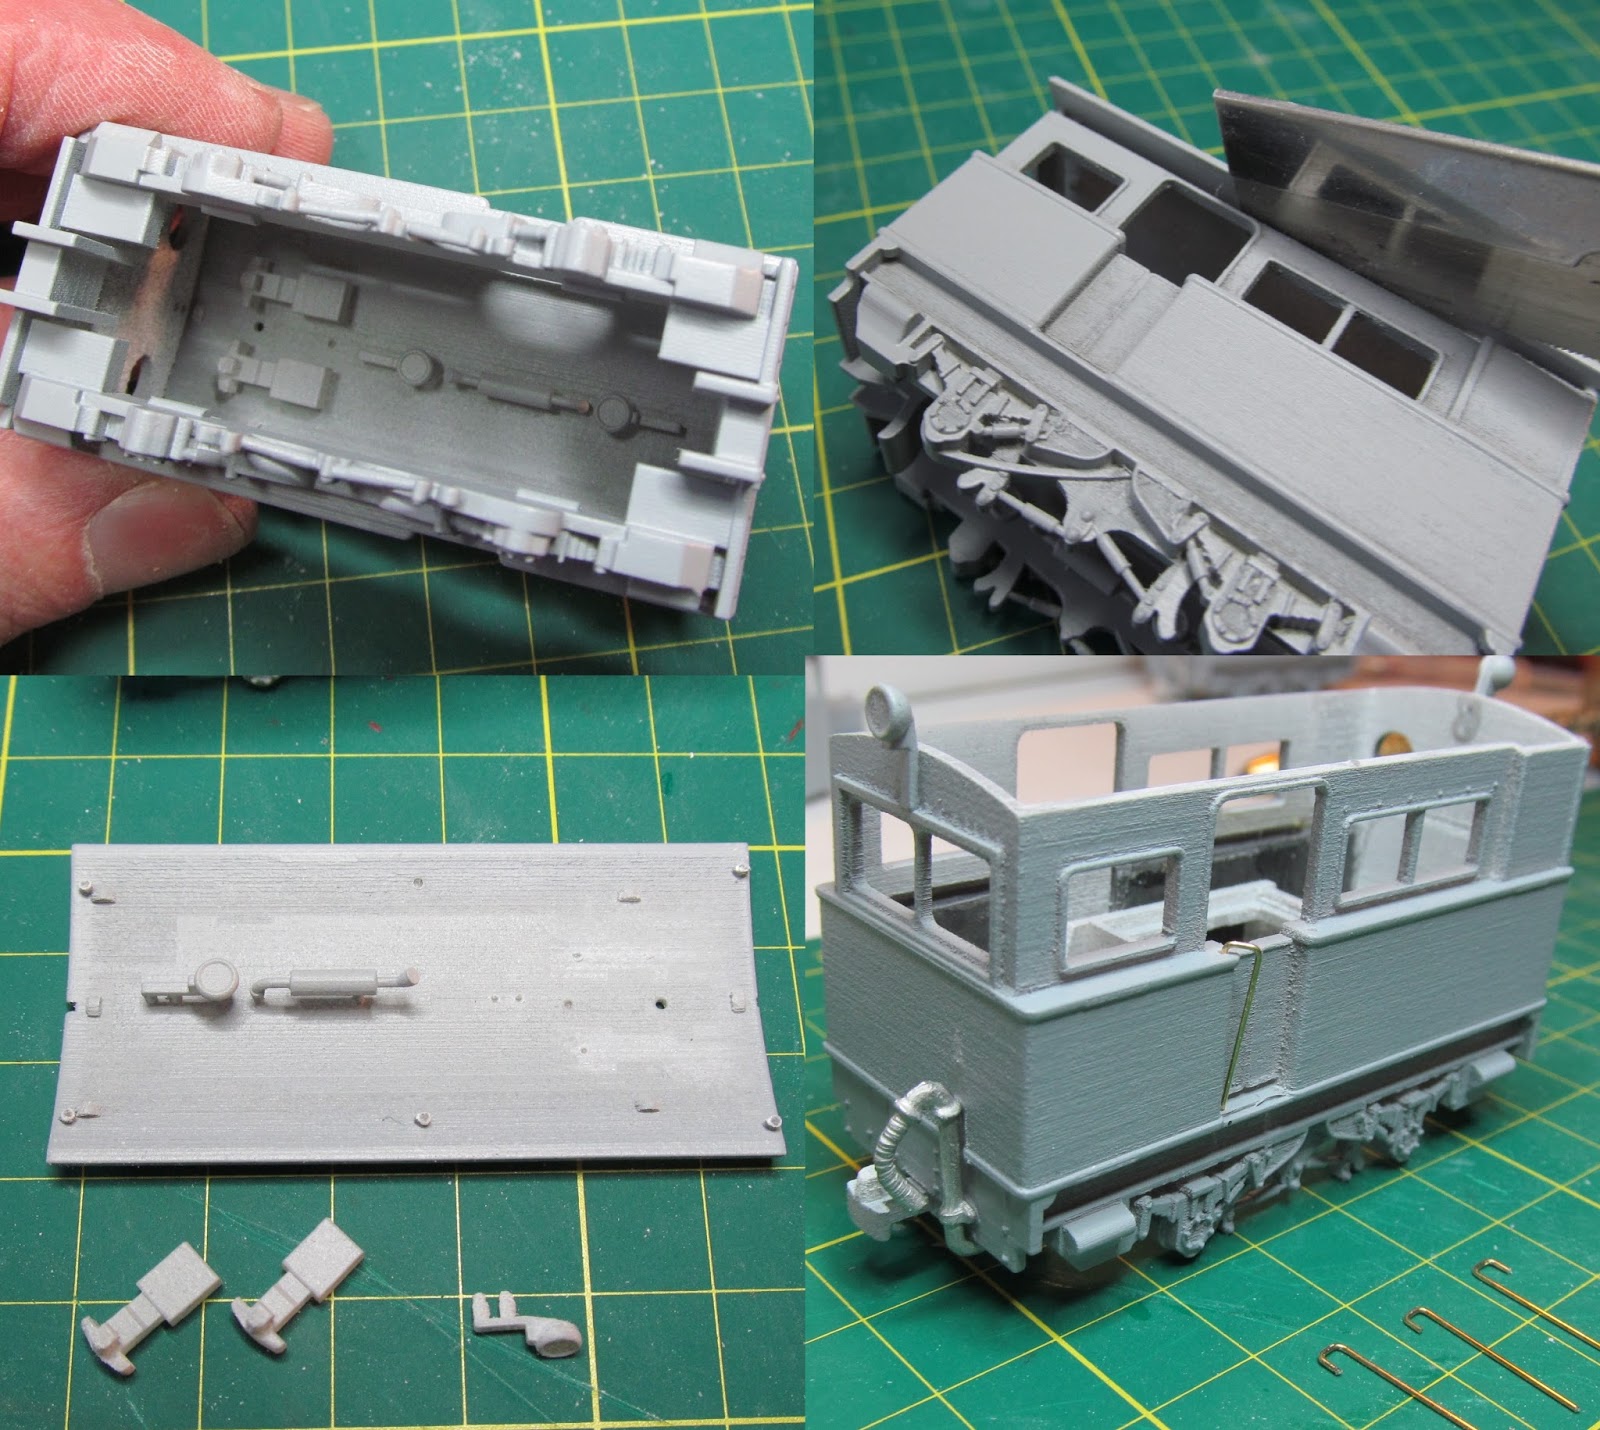
The print configuration in two halves cuts down the amount of support material by a considerable amount and therefore the cost. It still allows for the fitting of internal details and glazing before the coach is assembled. It is also much easier to add details such as the etched mesh to the balcony end frames from the inside before they are added to the main coachwork.
Because of the detailed panel-work on these coaches they are only available to print in Frosted Ultra Detail, this does mean that the balcony end frames are quite delicate and I have found that they may warp in transit. Fixing them into position on the model does push them back into their correct shape, but be gentle as this is done.

©  2017   David Hurst     All  Rights Reserved
 I have found it a good move to keep all of the print in one piece while you remove the waxy residue, wash and prime the print. I used a mid-grey spray primer and, once dry, the etched mesh was added to the balcony ends. I had a small diamond etch that I had bought at a local railway exhibition, which I cut down to suit the small end frames at each side of the balconies. These were fixed on the inside of the balcony using Cyanoacrylate glue (super glue). A final coat of primer was sprayed over the whole print and allowed to dry. 

©  2017   David Hurst     All  Rights Reserved

I decided to use a pair of Kato 11-099 bogies on this coach as they have an offset pivot, are small well engineered and have a free running wheel sets. The offset pivot on the bogie was particularly useful as it allowed the pivot on the floor of the coach to be close to the balcony steps without the bogie being restricted by them. This does mean that they are the wrong way round, the couplings facing inward, and should be removed. I felt that this would not be of any detriment as the coach    itself is short, and normal fixed coupling should cope on restricted curves. I did find that the pivot formed by the printer can vary in the thickness. This stops the free movement of the bogie from side to side. I used a small flat file to dress off some access material at the base of the pivot on the coach, which will allow the pivot clips on the bogie to engage on the inside of the pivot hole on the bottom of the coach and allow it to turn freely.   
My choice of finish was a Revel oil based paint ref SM 331 thinned slightly and I applied two coats of this to the sides, ends and the balcony ends. The frames and steps had a coat of dark grey Revel mat 9, the fall plates were a mix of the matt 9 and a silver to create a dark gunmetal finish. A wood colour mix was used on the balcony floors, and on the roof I used a Revel light grey matt 43 and white 5 mix. I left the inside of the coach in the light grey primer finish as this is pretty neutral.

©  2017   David Hurst     All  Rights Reserved
After the painting was completed, the glazing could be added with a sheet of clear acetate cut to suit the side windows, then glued in place with Cyanoacrylate glue (super glue). I found it simplest to position the glazing panels and then drop some glue on the edges, this would then run under the acetate and fix it in place. Apply a little light pressure while the glue is going off.
©  2017   David Hurst     All  Rights Reserved
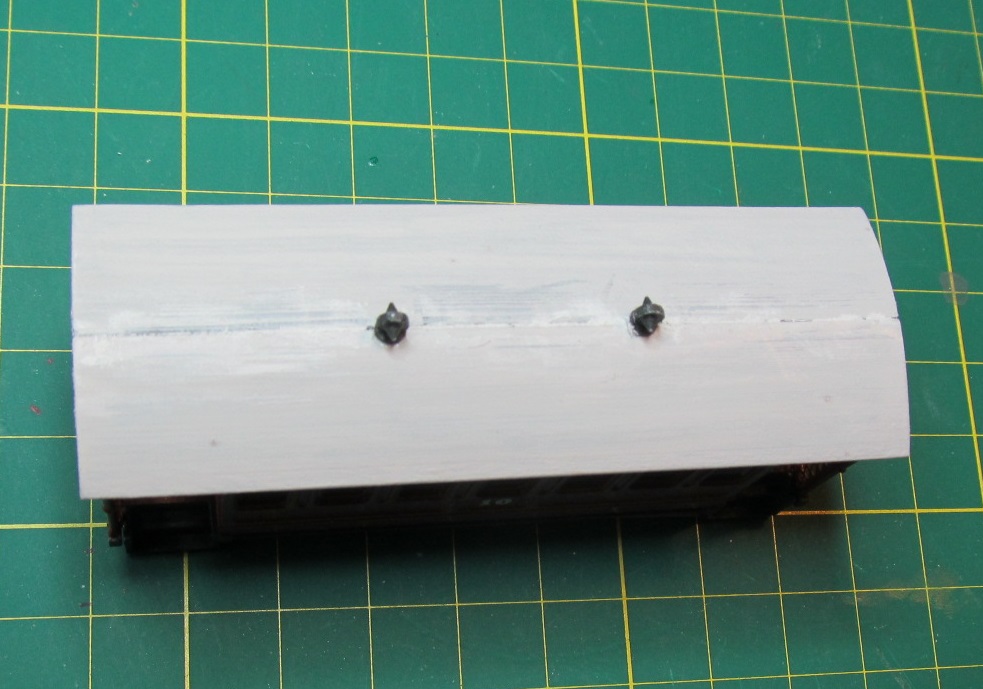
When you are assembling the coach the central roof joint will be the most obvious and this can be tackled in a few ways. One is to fill the joint after fixing the coach together and painting over the joint. Another method is to use a single lamination of toilet tissue paper to represent a felt roof covering: fill the roof joint, apply glue over the whole roof, then add the paper from the centre line letting the glue soak in as it is applied. Once the result has dried this can be painted, possibly in a dark grey to mimic the felt colour. The two roof ventilators are then added and finished in with the roof colouring.    
Numbers were added to each side of this particular coach. The central panel was used to display the number 10, the three panels under the windows being a good area to display numbering or lettering. Any style of around 1 to 2mm size will look fine.  I used the Fox Transfers FG1003 - Alphabet in white - Franklin Heavy, 2mm & 1mm which give a nice bold graphic.

©  2017   David Hurst     All  Rights Reserved
Once fully assembled – couplings added, glazing and painting fully completed- a coat of thinned matt or satin varnish was applied to all painted areas of the model. This helps to fix the transfers and pull the whole finish together. It is a bit of a personal choice, but I do like to add a measure of weathering to the final model. It removes that out- of- the box look. To do this I use artist’s oil pastels which have been made into a powder form. Black, burnt senna (earth/mid brown), light red and orange are the main colour pallet that I use.  It is also quite easy to mix these to create other shades. They are dusted on the model with a number 6 size paint brush that is kept specifically for this job. If you don’t like what you have done it can be cleaned off again, which is what I like about using oil pastel dust to do the weathering.   
©  2017   David Hurst     All  Rights Reserved
If you would like a copy of this model visit Model Engine Works at:

Additional notes added August 2019

Further variants of this style of coach are available from the Model Engine Works Shop on Shapeways. Both are slightly smaller and more economical to build. One comes with a clerestory roof like the original Clogher Valley coaches. The other has no roof printed, allowing you to supply your own. They both have window openers which can be positioned as you require. Roof vents are also supplied to add the finishing touch to the roof.

©  2019   David Hurst     All  Rights Reserved

©  2019   David Hurst     All  Rights Reserved

Further items will be need to complete the models, these include wagon chassis such as the Peco N" gauge chassis kits (Ref NR122 0r NR123) from Dundas Models. A set of couplings and acetate or clear Plasticard for glazing the windows.

©  2019   David Hurst     All  Rights Reserved


If you would like a copy of this model visit Model Engine Works at:


Thursday 30 November 2017

Phoenix


The C.D.J.C. Phoenix Diesel:

2020 Updates
©  2017   David Hurst     All  Rights Reserved


A Brief History

Built by Atkinson-Walker wagons Ltd of Preston in September 1928 as one of their Class A.3 engines. After a short trial by the Clogher Valley Railway, it was found to be totally unsuitable. By the end of 1929 Atkinson-Walker wagons Ltd had gone out of business, and with no buyer to be found the engine lay idle at Aughnacloy coach and wagon shed until 1932. It was bought by Henry Forbes for the County Donegal Railway and converted at the Great Northern Railway’s Dundalk workshop to diesel power. It was fittingly named the “Phoenix” and worked on the County Donegal Railway till its closure in 1959. It can now be seen in the Ulster Folk & Transport Museum.


Model Scales

This is an unusual engine both for its looks and how it came about, and makes a very suitable subject to model for a narrow gauge railway. It may not have skirts but the amount of detail at each side of the footplate does a good job of hiding whatever chassis is used. The initial model was drawn up in 4 mm scale to suit the Halling motor bogie at either 12mm for 00n3 or 9mm for 009.


©  2017   David Hurst     All  Rights Reserved
A further version being produced to suit the Kato 11-104 chassis in 009, this has a slightly reduced overall size to help it to blend in with the 9mm track and not look too top-heavy.
I have made it available in both 00n3 and 009 versions to print in Frosted Ultra Detail. It should also be possible to print in Strong and Flexible if required. If a suitable chassis can be found it is planned to make it available in TTn3 3mm scale also.

With Frosted Ultra Detail it is advisable to soak in “White Sprits” (Petroleum organic solvent – paint thinners) in order to remove the wax support residue left from printing, then a wash in warm soapy water should leave the surface ready for painting after it is fully dried. I use a grey or white spray primer to prep the model for finishing. In some areas, it will be necessary to remove print lines from the surface, and this can be done with a burnishing tool - I use a hardwood stick with a rounded point to get in the tight spaces. Do these processes before separating the print into its component parts so you will be less likely to lose any of the small pieces.


I have designed the bodywork and footplate in one, with the roof removable to allow for interior details and ballast to be fitted. A small exhaust and silencer, two work lamps and a pair of couplings are printed within the main body of the loco. These all need to be removed before the chassis is fitted. 

©  2017   David Hurst     All  Rights Reserved
Ballast
There are recesses in the sides to front and back of the cab openings which I have filled with lead sheet, at the front end (with the square windows) I have also added lead under the windows. This should give sufficient weight to the engine for traction and electrical pickup.

©  2017   David Hurst     All  Rights Reserved
 Fitting the chassis
With the Halling chassis it is a straight forward fit between the two pressure tabs front and back. It may be necessary to file a small amount off the inside of these tabs or add a shim on so you get a snug fit, but this depends very much on the printing process and is difficult to predict. The Kato chassis will need to be cut down to fit, the coupling mounts need to be cut off each end and also the axel boxes will need to be removed from the sides. I have added two small lead weights at each end of the chassis glued in place - this is not totally necessary but does keep the ballast low on the model.
©  2017   David Hurst     All  Rights Reserved
Wire-work
There is not a great amount of wirework on this model; just the handrails each side of the cab door openings. For this, I have used 0.45 mm brass wire and drilled out the pilot holes to suit. They are, however,  not straight: the tops are turned to 45° outward, this makes them look straight when they are viewed side-on. See picture which may explain this better. 
©  2017   David Hurst     All  Rights Reserved
Couplings
A pair of printed couplings are supplied with the models. On the 00n3 they are printed under the footplate while on the 009 they are printed under the roof, along with the other small detail parts such as the exhaust and work lamps. For the prototype models, I have used one printed and one Greenwich type coupling on the 00n3, and both printed on the 009 versions.

©  2017   David Hurst     All  Rights Reserved
Glazing interior details
For the windows I have used thin acetate saved from old packaging which is glued with a contact adhesive and is great if you have curved or awkward shaped glazing, being thin and flexible to use. I fit the glazing when building the model, and then fix it in place in the final stages after the painting is completed, and before any weathering is done.  
Vacuum pipes
These are white metal from a Vale of Rheidol coach; supplied in sets by Dundas Models. I used two of the smaller one on these models.
Painting
After initial preparation of the model it was given a couple of light coats of matt grey primer then burnished and smoothed, with a final coat of primer to finish off. A base coat of matt white was applied before the cream was added (the grey is too dark for a cream base coat). After this had time to dry I used a mix of Revel No 36 red and No 331 red burgundy on the lower part of the body. The cream on the upper bodywork was a mix of No 5 white and No15 yellow. The footplate, roof, handrails, lamps and windows were all done in a charcoal grey No 9. I dry brushed a little silver around the mechanical parts under the footplate which highlights the details; also some gloss varnish gives the impression of oil on these areas. The impression of rust was added to some areas of the footplate, buffer beams and running gear with a dry-brushed application of Revel No 37 and No 85.  
I have printed the C.D.J.C. logo on photographic semi-gloss print paper, which has allowed me to size and print to suit 4mm scale, and have then fixed it to the model with Cyanoacrylate (super) glue. The print is sealed with a coat of matt varnish which softens the edges fix the print and helps bond it to the finished model.
Graphic details
I have used 2mm white lettering for the “PHOENIX” name; these are from Fox Transfers ref F-G1003 Franklin Heavy 2mm & 1mm. With the aid of a piece of masking tape which had index marks for each letter I was able to place the individual letters straight and at the correct spacings on both sides of the cab, the “OE” arrangement being the fiddliest as the “O” is cut vertically and joined to the front of the “E”. The other point to note is that there are only two letter X’s on the Fox transfer sheet. As I was making two models this left me two short. I overcame this shortfall of letters by cutting the bottom leg of two of the Y’s and joined them together one part upside down.

©  2017   David Hurst     All  Rights Reserved
The number 11 plates on the upper cab sides were drawn to scale and I asked Narrow Planet to produce a pair of these brass-etched plates for each model. After painting the background in a matching red to the lower bodywork, the number plates were added to each side of the cab, fixed in place with the Cyanoacrylate (super) glue.   

©  2017   David Hurst     All  Rights Reserved
After adding the decals number plates and logos, the final little bit of detail to add was the work lamp lenses. For these I used 2mm Clear Rhinestones, fitted after painting was completed.
©  2017   Paul Titmuss     All  Rights Reserved
I finished overall areas with a coat of matt varnish. I then added weathering with powdered wax pastels, using mixes off orange, brown and black, to give the engine an overall weathered and well- used appearance.  

©  2017   David Hurst     All  Rights Reserved

In early 2020 Kato introduced there new and updated versions of their popular 11-103 and 11-104 chassis, these are now phasing out and being replaced by the 11-109 and 11-110. With this change, I have made some simple alterations to my models using these chassis.
 If you would like a copy of this model it is available on Shapeways at Model Engine Works:


Wednesday 7 June 2017

00n3 Hudswell Clarke/Fowler Inspired Diesel Loco

UpDated 2020 

©  2017   Paul Titmuss   All  Rights Reserved
I have been working with Paul Titmuss again this time to produce a freelance 3 foot gauge Diesel loco. A combination of two small industrial engines, the foot plate, bonnet and chimney come from a Hudswell Clarke used at Davyhulme sewage works, and the cab comes from a Fowler used at Marland Clay Pits. This blend of two small industrial locos has been used to produce what might have run on the 3 foot gauge Castlederg and Victoria Bridge Tramway, if they had gone ahead and purchased a Hudswell loco in the 1930s.


©  2017   David Hurst     All  Rights Reserved

We again worked around the Halling motor bogie with 9mm wheels at 12mm gauge and set at 23mm wheel centres. This did mean that the bonnet had to be wider than the Hudswell Clarke images indicated and has given the engine its own look, different from the donor locos.

©  2017   David Hurst     All  Rights Reserved

The plan was to make this a multiple part model - foot plate, body, roof and radiator grill. Holes would be made for the bonnet door handles and hand rails both at the cab door and bonnet sides. These holes could be filled if they were not required, but are much easier to use than setting out and drilling for holes on a blank model.


©  2017   David Hurst     All  Rights Reserved

With the radiator grill being loose it is possible to exchange the printed grill for a brass etched mesh to give the engine a more bespoke look. This is best pre-painted and fitted before the body is fixed to the footplate.

©  2017   David Hurst     All  Rights Reserved

Further to producing the 00n3 model I have also worked on a 009 and TTn3 version which I will make available at the same time through Model Engine Works on Shapeways. The prints for the 00n3 and TTn3 will be printable in Frosted Ultra Detail only and the 009 will be available in White Strong & Flexible Polished as well as Frosted Ultra Detail.

©  2017   David Hurst     All  Rights Reserved

The 009 version will be designed to run on the Kato 11-104 chassis and the TTn3 will run on the TU-TMC100 - Tsugawa Yokou 14033 mini 4 wheeled N gauge chassis.

©  2017   Paul Titmuss   All  Rights Reserved


Wire work
The wire used is 0.45 mm on the 4 mm scale and 0.33 mm on the 3 mm scale model, and it is fixed with cyclonic type glue. Note it will be necessary on the Strong & Flexible plastic models to drill out the holes with a suitable size drill as the printing process can leave residue in the pilot holes.

All of the proto type models have small bent wire handles on the bonnet doors; these are inserted in the pilot holes formed on the model and glued from the rear. The cab hand rails have been formed by bending a D-shape in the appropriate wire and using the holes provided in the cab, passing the wire right through and gluing from the inside. It is best to do all of the wire fitting with the body separated from the footplate.


©  2017   David Hurst     All  Rights Reserved

For the bonnet handrails Paul and I have used different methods - which the model allows for. Paul has used the three top holes on each side of the bonnet and added small hand rail posts and wire. I used the four side holes with wire only, and formed a pair of a D-shaped handrail sections to locate in the end holes. I then passed wire right through the bonnet in the middle holes, just sticking out enough to form the mid supports. I have glued the wire in place and this has made a robust handrail with two mid supports. 


©  2017   Paul Titmuss   All  Rights Reserved


Cab Details  
Paul has added a level of detail to the cab interior including a reversing lever and brake.  The production print in 00n3 will have holes for these so they can be added to the footplate inside the cab. It will also have a more closely fitting footplate to the rear fly wheel of the chassis, which should give more floor area for crew and details. 

©  2017   David Hurst     All  Rights Reserved

Couplings
We have tried a few variations on these models; Paul has a specific height to maintain for his existing rolling stock so he has used a standard Greenwich coupling. A pair of printed couplings comes as part of the footplate on the 00n3 print. 


©  2017   Paul Titmuss   All  Rights Reserved


I have used the printed couplings from the 009 version on the TTn3 model to see how they perform and RT Models 4NLP005 Penryhn Locomotive couplings in white metal on the 009 version. This required the holes provided in the buffer beams for the NEM pockets to be filled with small rectangles of Plasticard. I plan to print all of the versions of the model with base couplings. 

©  2017   David Hurst     All  Rights Reserved

Ballast  
All of the prints have weights added: as much as possible to the footplates; the rest as low down on the body as possible. This will keep the centre of weight as low as possible, and prevent the model being top heavy. 


©  2017   David Hurst     All  Rights Reserved

Maker's name plate
I have had a bespoke “Hudswell” maker’s nameplate etched by Narrow Planet to suit the 00n3 and 009 versions of the model. This sits on the curved flat area above the radiator, and will hopefully add that finishing touch to each of the 4mm models. It is possible to order one of these separately from Narrow Planet should you want to add one to your model. 

©  2017   David Hurst     All  Rights Reserved

Painting
Paul will be building the 00n3 version of the model in Frosted Ultra Detail, and I will work on the 009 in White Strong & Flexible Polished and the TTn3 in Frosted Ultra Detail. We have both had our own ideas for the paint scheme on the locos. Paul has chosen to go with the dark green as used on his Clogher Valley Tram engines; this diesel will eventually be used on the same layout, yet to evolve. I, on the other hand, have decided to go with a black finish on the 009 engine using what is actually a dark grey Revel No 9 paint; and a dark blue Humbrol No 104 on the TTn3 engine. Both have black/dark grey footplates, and both will have red buffer beams at front and rear. The 009 has a more worn industrial look about it - I hope this will help to show the very different looks that can be achieved with this print.      

©  2017   Paul Titmuss   All  Rights Reserved


©  2017   David Hurst     All  Rights Reserve


©  2017   David Hurst     All  Rights Reserved


©  2017   David Hurst     All  Rights Reserved


In early 2020 Kato introduced there new and updated versions of their popular 11-103 and 11-104 chassis, these are now phasing out and being replaced by the 11-109 and 11-110. With this change, I have made some simple alterations to my models using these chassis. 


©  2017   David Hurst     All  Rights Reserved

If you would like a copy of this model visit Model Engine Works at: 


Sources of Additional Materials

Cab interior details from: 
RT Models 4NLP022 Etched Brass locomotive cab detailing

Handrail wire and knobs:
Alan Gibson Brass Wire ref 0.45 mm and 0.33 G4M136, and Handrail Knobs 4mm short ref G4M53

Couplings:
Coupling Pockets Peco NEM ref GR-103
Greenwich Coupling ref CPL 3 for NEM pockets
RT Models 4NLP005 Penryhn Locomotive Couplings in white metal

Engine crew:
Crew ideas Dapol C002 Railway Workmen
Modelu-3d printed railway figures

Engine number: 
Number on 009 engine Old Time Workshop Talyllyn Coach Numbers 1-25
Custom Maker's Name Plate, brass etched by Narrow Planet