Showing posts with label Irish narrow gauge railways. Show all posts

Tuesday, 13 September 2022

009 Coaches Using Moulded Sides


A set of coaches to complement a 009 Beyer Peacock with G.W.R. theme livery.


© 2022 David Hurst All Rights Reserved

I decided to replicate a previous coach build using the same Ratio coach sides. My plan was to cut and reform these into sides for a small bogie first coach with three compartments, using a set of Ratio 612/123 GWR Composite coach sides. Also a small six-wheeler three compartments third coach, and a brake/mail coach also a six-wheeler, using Ratio 613/123 GWR Brake 3rd coach sides.

The wheel sets for these would be a Peco GR-106 bogie set for the bogie first coach and three Peco 10ft wooden wagon chassis to form the six wheelers.


© 2022 David Hurst All Rights Reserved

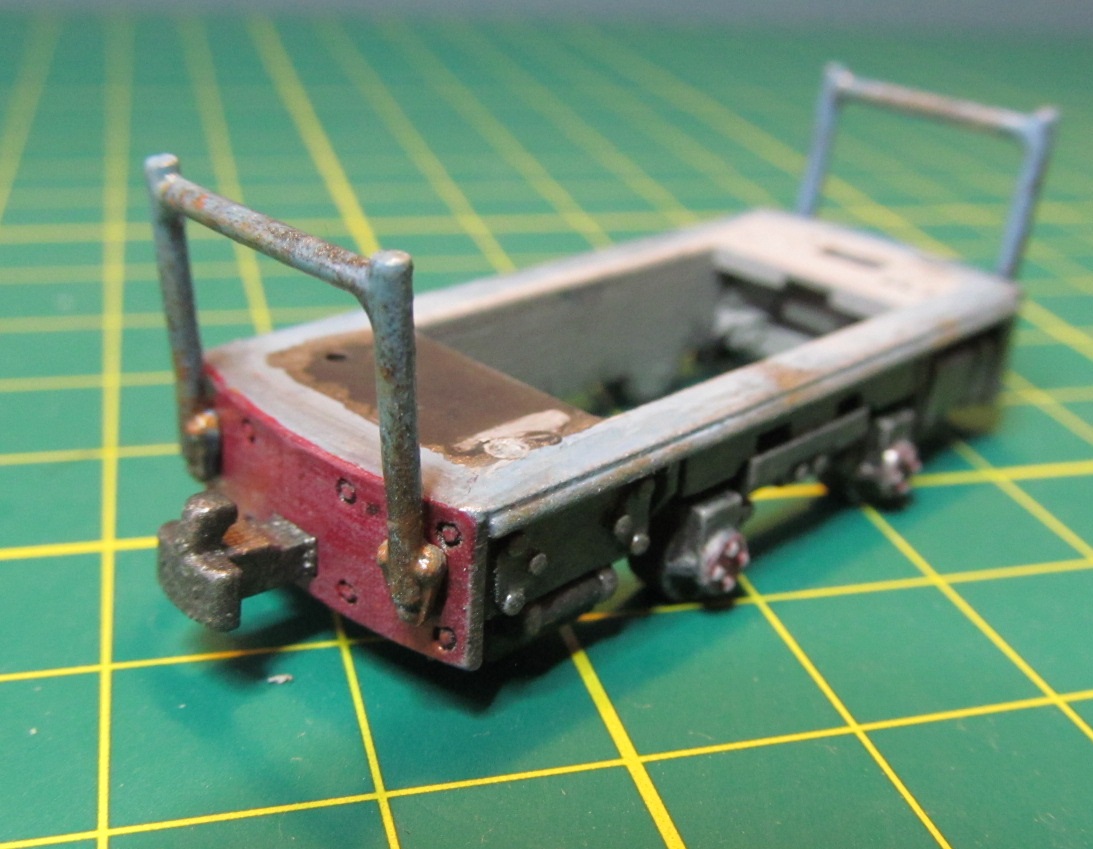
The plan with Peco 10ft wooden wagon chassis was to cut the first one in half and use the brake details, then cut a second to fit equally between the first removing the brake details just leaving the axle boxes of the central one. All of the moulded buffers were removed leaving clean square ends to butt together and glue with liquid polystyrene cement. This was done, top down on a flat non plastic surface. This created the chassis frame for the brake/mail coach which was going to be visible.


© 2022 David Hurst All Rights Reserved

For the second chassis, I did the same thing cutting a chassis in half, but this time removed all the brake gear and with the remaining axal box from the first conversion I positioned this between the two halves, then with some Plasticard packers added between to create a longer version to suit the compartment, third coach. This coach frame was to have running boards fitted at the height of the axle boxes so details like the baking gear would not be seen.

The central wheels are flangeless, a simple solution and while fiddly to create is an idea that has been used for a long time by manufacturers. These N gauge wheels are so small it is very hard to see if they have flanges or not. I did the removal with a sharp scalpel, carefully scoring around the wheel rim several times until the flange ring popped off. When on the track it looks as any six-wheeler would but has the simple ability to negotiate tight radius curves like any four wheel chassis.


© 2022 David Hurst All Rights Reserved

The core of the coach body is formed in 3mm balsa wood, this includes the base and compartment divisions. These are cut and shaped to a template, so they are all the same section. They are then glued to the base at 90º to line up with the coach sides window frames. On the compartment, third coach the thickness at the edges was reduced on both sides to allow for the thinner window frame sections. The coach ends are cut and shaped from 1mm Plasticard again using a template to get them all the same. The plank effect is scribed (not cut) into the surface with a sharp pointed Vee, using the back of a knife blade, then clean off with wet and dry paper to get rid of the burs.


© 2022 David Hurst All Rights Reserved

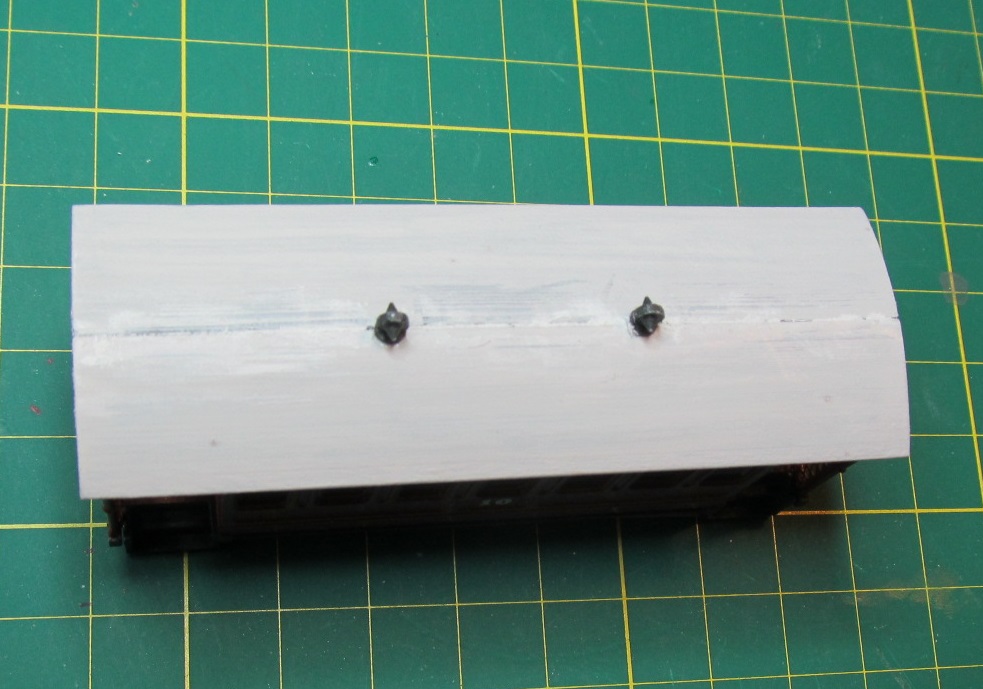
To form the roofs, I have used a cold moulding method with brown gum paper tape, not the reinforced type but the artist's type which comes on a very long roll and is 50mm wide. The former for the roofs is the spray primer can which I later used to prime the model, so nothing special. It is just the right length and curve for the job. The first of 5 layers are stuck in place on the can with masking tape at each end gum side up, lining this up carefully is important to make sure the roof is not twisted. The next layers are all added to this gum side down, dipping in a shallow tray of water to activate the gum. These are cut smaller than the first layer, so they do not cover the masking tape and make it easier to remove when dry. The roof should be left to dry fully usually overnight will be fine. They can now be cut to size to suit the coach body they are to be used on.


© 2022 David Hurst All Rights Reserved

The roof is located with some small strips of balsa wood at each corner, the rain gutters are made from strips of Plasticard bent and fixed with contact adhesive, and the roof vents are a set from Dundas Models. Once all was put together and dry, I sprayed it with a grey primer. It was then cleaned off any blemishes.  I used a combination of grey and white primers to give different shades of grey on each of the coach's roofs.


© 2022 David Hurst All Rights Reserved

The coach bodies and chassis were then assembled onto the balsa wood cores using contact adhesive, and the ends and sides were glued with liquid polystyrene cement. After this a set of running boards were added, one on the bogie first coach, two high on the compartment third coach, and steps only at the doors on the brake/mail coach. This gives a good idea of what the various styles look like. To strengthen the lower boards on the compartment third coach, I used some small wire brackets bent at 90º and fitted into holes drilled in the bottom of the upper running boards when fixed to the coach. The lower boards were glued to these and the axle boxes, which has been a good stable platform.


© 2022 David Hurst All Rights Reserved

Next, I added Peco NEM coupling pockets to the coaches, these can sit directly in front of the N gauge coupling mouldings, you will need to open the mouldings out to allow the new pockets to be fitted in the correct positions on the chassis, also a small amount of the pocket mould will need to be trimmed back. The good thing with these is that they sit at more or less the right level to work with other 009 couplings.


© 2022 David Hurst All Rights Reserved

Painting, I used a grey primer as the base coat, I then masked off the bottom and interior of the windows to spray the upper sides in white primer. The upper coach sides were finished in a matt mid-cream mix and the bottom and ends of the two passenger coaches were finished in a Humbrol M160 brown. The brake coach was finished in a red/maroon mix giving a deep red shade, the ends of this one and all of the coach chassis and running boards were finished in Revell M9 Anthracite. Handles were picked out in Humbrol brass metallic, and the window frames were lined in the respective coach bottom colours as a contrast to the cream upper sides.


© 2022 David Hurst All Rights Reserved


The lettering was added using some Old Time Works gold First and Third signs on the centre door mid panel of the passenger coaches. The brake coach received Guard and luggage on each door and black 2mm MAIL on each side upper panels between the doors. A black lining added a definition between the upper cream and the lower colour, this was done with a Staedtler permanent Lumocolour fine pen and a ruler. All of this was then sealed with an overall coat of satin varnish to all areas of the coaches.


© 2022 David Hurst All Rights Reserved

I then added some sheet lead weight to each of the coaches and clear glazing as a finishing touch. The results are good vernation on the wood grain coach I did using this method previously. They look well with the Beyer Peacock. Also, I have a nice simple method of making 009 six wheelers now, I will have to try it on some wagon next.


© 2022 David Hurst All Rights Reserved


Sunday, 3 April 2022

Castlederg and Victoria Bridge Tramway Beyer Peacock 2-4-0T

© 2022 David Hurst All Rights Reserved

The creation of this model started as a challenge to me to create a 3D printed chassis as well as an engine body. I picked the Beyer Peacock 2-4-0T as it worked well with the motor, gears, and wheels I had selected for the job. Over time and several versions of the model it evolved and I got one to work with a Halling motor bogie as a temporary chassis. This was taken to a meeting at the Oldham 009 group in November 2021 where it ran on Paul Titmuss’ 00n3 layout Wood Brook.


It was suggested that it would be a good idea to work up a copy of the Castlederg and Victoria Bridge Tramway Beyer Peacock 2-4-0T but with motion covers and frames on both sides to allow the use of the Halling chassis. With a lot of help from Paul and the 00n3 group, a 3D model was drafted based on the original and confirmed as looking correct. The idea behind this model is to offer to modellers a tempting introduction to the 00n3 gauge.

This also turned into a challenge for a friend who runs a small 3D printing business Thingymaker to see if he could produce a print to compete with Shapeways. This is a challenge that has for several years eluded him. I had a pair of prints produced by Thingymaker and Shapeways. These were both in acrylic resin but using two different processes, so they are not exactly alike, but the level of detail is good and sharp on both prints. Both do take a bit of preparation to make ready for finishing in different ways.

© 2022 David Hurst All Rights Reserved

The Shapeways print in Fine Detailed Plastic, as usual, needs the wax support residue removed and a fair bit of surface residue removed from some of the print faces before priming and adding details. But this is as we expect form this material. The Thingymaker print is supported on sprues and they are tightly packed inside the print, so a bit of careful removing is needed to avoid breaking anything off the model. There is also some work to do on the internal surfaces of the print to remove some areas where the resin domes as it finishes printing, a bit like surface tension on a liquid surface. This is a little bit fiddly on some of the smaller parts but not insurmountable


I have developed the model to print in several parts, a bit like an “Airfix” kit, we have the main body, the upper cab and the front bogie are the main pieces. Details parts such as the sandboxes, smoke-box door, funnel, bell dome, and safety valves, Westinghouse pump, toolbox, water tank filler caps, air cylinder, and boiler fittings are separate for ease of finishing and adding more details.


© 2022 David Hurst All Rights Reserved

There are also several other small parts that I have added. Cab handrails formed in 0.45mm brass wire, pilot holes are formed in the bodywork for these, a brass whistle by Markits, brass grab rails on the boiler using short handrail knobs, and wire again by Markits. Pipework from the boiler fittings to the cab in soft 1mm steel armature wire. I also used this to make the coupling hooks mounted on the front bogie and under the rear buffer beam. This was obtained from a jewellery craft supplier on eBay and is soft and pliable.

© 2022 David Hurst All Rights Reserved

To create the bogie pivot a 12BA cheese head machine screw was used with a couple of washers, one under and one over the bogie frame. The thread was screwed straight into a tight hole drilled in the bodywork where a pilot whole marks the location to drill. The wheel set on the bogie was from a Tralee and Dingle Railway van by Dundas Models. The axles were slightly shortened with a file, turned down in an electric drill to give a clearance fit in the V pockets of the bogie frame, and retained by some 0.45mm wire slotted in holes under the axle in the frame. A small amount of sheet lead was added to the top of the bogie frame to give it a bit of weight, and help it to run better. Lead sheet was also added to the tank sides above the motion cover frames on each side of the body, which seemed to add enough weight to give the model reasonable traction.


A pair of white metal vacuum hoses were carefully reshaped to work on the front and rear of the model. The front one is flat and sitting on top of the buffer beam, the hose retained to the right side viewed from the front. The rear one sits to the left side of the buffer beam viewed from the rear, with the pipe bent towards the coupling hook then under the beam. These can also be done with armature wire of about 1mm diameter.

© 2022 David Hurst All Rights Reserved

When painting the model, I gave it a few coats of grey spray primer. Most of the parts are painted separately and added to the model when dry.

The crimson lake I worked with is a mixed colour using Humbrol gloss 20 maroon and a bright matt red Revel M36, the same one I used for the buffer beams. This is toned down on a second coat with the addition of a Revel red-brown matt 37M to the mix which takes most of the shine away but leaves a matt to a satin finish.

I have then dry brushed on some Revel 9M charcoal black to highlight the rivets and shadows on the model. The 9M charcoal black is also used on the foot pate, motion frames, roof, bogie, and smokebox areas. Some parts are highlighted using a mix of the black and silver (gunmetal). Areas like the bogie axles boxes, cab steps, smokebox door handles and hinges, Westinghouse pump, pipework, and handrails all benefit from this.

© 2022 David Hurst All Rights Reserved

The models had their first outing at Narrow Gauge North in March 2022 and were displayed on Paul Titmuss' layout Wood Brook. This is where the pictures show them running.


© 2022 David Hurst All Rights Reserved


I would like to thank the 00n3 group of the 009 society for all their help in producing this model.


This is a list of items and supplier used on the model

3D Printed Body 
Model Engine Works at Shapeways

Also through Thingymaker a UK based printer


1-Halling Motor Bogie ref Verio 4W Drive H0m   Supplers: Halling Modelle

ref Verio 4W Drive H0m

IDANT-VAR-HOM-DG 9mm SD wheels


2-Bogie wheel set Dundas Models


Mosskito 8.0mm metal wheels – solid disc DW86

12mm gauge

Vale of Rheidol Vacuum & Heating Pipes DP03

Short on rear & long on front


3-Small metal parts Wizard Models Limited

RM10: Medium Handrail Knobs (Pack 12)

AG04: Short Handrail Knobs (Pack 25)

ebay suppliers

0.45mm Brass wire (pack off 10 handrail wire)

0.7mm Brass wire (pack off 10 modelling wire)


BA Brass Cheesehead Screws, Nuts & Washers(20pk) BA 12 BA


200 x 30cm x 0.9mm Steel Armature Frame Wire

Galvanised for Jewellery, Modelling


4-Company Crest

The C & V.T. crest was printed on a home inkjet printer

using a Image imported into a word document and sized to suite.

Decals can be supplied by Custom Model Decals

Tuesday, 8 December 2020

4mm-3mm Scale Photographic Diorama


                                           © 2020 David Hurst All Rights Reserved

An important part of displaying and photographing my models is the Diorama backdrops they are shown on. I have found that something with a raised track on an embankment or over a small bridge is useful as it allows for eye level shots.
                                        © 2020 David Hurst All Rights Reserved

They do not need to be large and are also a good way to display items of stock at home or at shows, a very good way of practising scenic techniques without committing to a full layout. They can be formed from any light and rigid material such as polystyrene or Polyboard. For my recent ones, I have been using 25 mm polystyrene bonded between outer skins of 4 mm plywood. This gives an extremely light and rigid block which may be shaped with a sharp blade. A sharp short pointed kitchen knife if you are allowed one of these.
I have left the base plywood as a rectangular piece and the upper skin has been pre-cut to the shape of the track bead, this makes it much easier to work the profiles of the surrounding landscape into the polystyrene core block.
                                        © 2020 David Hurst All Rights Reserved

I usually, work from a plan sketched on a piece of wallpaper lining paper; this gives me the position and scale of the main elements of the scene, roads, rivers, rocks, structures, walls, fences, gates and trees. For my latest scene, I have used a small stone bridge, the kind that would be used on an embankment to allow for a small lane or river. This has given me an excuse to add a kink in the track plan, always more interesting than a straight piece of line.
                                         © 2020 David Hurst All Rights Reserved

After cutting out and gluing the plywood and polystyrene together with PVA the glue they were cramped together using a workmate vice, it is best to leave this overnight as the PVA takes some time to dry between the polystyrene.
While this is drying the stone bridge was formed so the landscape could be carved out around it and make sure we get a snug fit. Other elements like fencing and trees can also be pre-made at this time. For this scene, I have used a combination of stone walls, wire fence, and hedges.
                         © 2020 David Hurst All Rights Reserved

The bridge and parapets have been formed in Wills embossed plastic sheet random stone with corbel sheet forming the coping's, the bridge was made in two halves so it could be glued back together again under the trackbed when fully painted and weathered. A base coat of a dark buff colour was used, then further thinned and dry brushed coats of grey, charcoal and earth brown were added, further thinned and dry brushed coats of grey and olive green finished the paintwork off. This should not look uniform but also be in the right areas. The dark charcoal staining on the upper parts of the stones, the green staining around the base and some run down from the coping’s, some areas of buff should still show through the other thin layers of paint.
When the base has dried, I used a sharp short pointed kitchen knife to carve the polystyrene to shape following the profile of the plywood trackbed as a guide. I then used the pre-made bridge to gauge the hole needed under the track for it to fit correctly with the capping’s level with the top of the track.
A rasp file was then used to take all of the sharp edges of the plywood and blend it in with the polystyrene. The edges of the block were then smoothed with some 240 grid sandpaper.
                                         © 2020 David Hurst All Rights Reserved

The next stage was to give the whole diorama a durable shell to apply the decorative finishes too. I have used a brown gum paper tape; this is available form art materials suppliers. I use this for lots of cold moulds forming in my projects, and by building up multiple crossed layers on a former, it is very strong and durable when dried. I used about 6 layers on this diorama, formed in two stages, letting each application of about 3 layers dry before applying the next. Ones it dries it contracts and tightens on the mould.
                                        © 2020 David Hurst All Rights Reserved

Next I added the track, Using Peco 009 rustic flexible track formed into the shape I required, this was bonded to the upper plywood surface with PVA glue and held in place with small clamps overnight till the glue dried. Once dried a couple of check rails were added to the curved sections each side of the bridge, these also extending over the bridge and were held in place with some track pins. The sleepers were predrilled before these pines were pushed in place with some pliers. It was necessary to bend the check rails to shape before fitting them. I painted the sides of the rails with a dark grey & brown mix of revel oil paints to take the shine off the new track work.
The bridge could now be fitted in place ready for the landscape base material to be added around it. The two halves were bonded together with polystyrene cement and then glued in the correct position on the diorama using some contact adhesive.
                                           © 2020 David Hurst All Rights Reserved

For the landscape base I used a mix of plaster filler, PVA glue, and mixed brown powder paint into the mix. This gives a pre-coloured base paste which does save painting the landscape before applying scenic materials such as static grass and scatter materials. It also has the advantage of a stronger plaster that can be applied in a thinner layer which is there for lighter, and if you work it after you have finished the scenery it does not show white through, just a soil colour. The more PVA you add the smoother the mixes surface will become and the longer it takes to dry. Add as little water as possible to form a thick paste, as a dryer mix is easier to apply.
                                        © 2020 David Hurst All Rights Reserved

After letting the base landscape mix dry my thoughts turned to add the track ballast. I wanted a fine stone for this and came up with fine dry building sand which has been sieved. I then added some grey powder paint to this and mixed it dry. Because of the colour of the sand, this did give me a darker coloured ballast, this was not a problem as I wanted to dry brush a lighter grey over some areas and other parts will be covered with static grass. The powder was added round and between the track dry and a medium sized paintbrush used to spread the ballast in and around the sleepers. This was then fixed with a glue mix off 50% PVA and 50% water; a small drop of liquid soap (washing up liquid) is also added to allow the glue to flow through the powder. The glue mix was applied with a syringe; two lots of glue were applied, leaving the first to dry overnight.
The landscape materials were a mix of 3mm late summer dry grass and 2 and 3mm mid tones of green static grass, I used some sponge scatter in patches to give depth to the landscape colour. A rock outcrop and banking was formed using some small sandstone shards crushed up into 4mm scale rocks and bedded in the plaster before it set.
                                        © 2020 David Hurst All Rights Reserved

Trees were formed with wire armatures which I painted with a plaster mix similar to the landscape. A mixture of landscape material ware used to form the foliage, these included Woodland Scenics foliage and sponge scatter added to the armatures with contact adhesive and PVA glue. Some small trees ware formed with a bamboo trunk and lichen sprinkled with sponge scatter applied over the top. This method was also used to form gorse bushes with the yellow flowers being added by using a yellow acrylic paint dabbed over the top and upper sides of the bush.
For the fencing I used lollypop sticks cut to a suitable section and length and drill with some fine holes through which I threaded a grey cotton thread, leaving this long to allow the fitting of the fence posts before drawing the thread tight and sealing it with PVA glue.
                                      © 2020 David Hurst All Rights Reserved


Sunday, 28 October 2018

009 Industrial Diesel


©  2018   David Hurst     All  Rights Reserved
This is a small industrial loco based on the one used at the Guinness Brewery in Dublin. It is now an exhibit at the Ulster Folk and Transport Museum which is situated in Cultra near Belfast. 

My idea was to find a small to medium size industrial loco with an interesting look about it, I wanted a compact design where the cab was low enough to be used for both industrial and mining purposes. The one used at the Guinness Brewery in Dublin fitted this model very well, being designed to be used within the tight clearances around the Brewery complex in Dublin. 

The other good point about this engine was that it was no plain Jane; it had a good level of detail both under the footplate and around the bodywork. This is very good for adapting the design to suit a particular chassis. With the small size and narrow wheel base of this engine I have looked at using the Tomy-tec H1 chassis. It has turned out slightly larger than I planned, more on the medium size, but looks as if it is man enough to do most types of industrial haulage jobs. 


©  2018   David Hurst     All  Rights Reserved
The model is printed in separate parts: the footplate, (which could be the basis of a different model) the body, the roof and the radiator. There are also smaller details printed within the body and footplate, including  an exhaust system crash bars, work lamp, brake handle, and cab seat. Some generic couplings are also included, but other types can be used also.

The Tomy Tec HM-01 chassis I have used needed to have its footplate reduced in width so I dismantled the chassis and cut the footplate down. This is much easier to do and a neater job is achieved. It all just clips back together again.


©  2018   David Hurst     All  Rights Reserved
Because of the engines size and the level of detail it is only suitable to print in the Fine Detailed Plastic.

©  2018   David Hurst     All  Rights Reserved

When using the Find Detailed Plastic form Shapeways the first thing I do before removing any of the parts is the soak the print in a paint remover / petroleum sprits (white sprits in the UK). This is to remove the wax support residue left from printing, and then a wash in warm soapy water should leave the surface ready for painting after it is fully dried.

©  2018   David Hurst     All  Rights Reserved
I use a grey or white spray primer to prep the model for finishing. In some areas it will be necessary to remove print lines from the surface. These sometimes only show up after the primer is applied and can be removed with a burnishing tool.  I use a hardwood stick with a rounded point to get in the tight spaces. Further light coats of the primer will give a good working surface on which to apply the finishing coats of paint .

©  2018   David Hurst     All  Rights Reserved
At this stage it is time to separate all the detail parts from the main body and footplate of the model. Most of the small parts will snap off the sprues with a genital push or twist, as the base of the sprues are smaller and weaken to allow for this. The main parts however are best cut from each other using a razor saw.

There may be a little more cleaning up to do on these small parts now that they are accessible all-round. Once this is done check that they all fitted into the corresponding holes made for them on the body of the engine. The fiddly ones are the driver’s seat and the brake handle column, for which I used small tweezers to hold the parts while putting them in place.
The chassis was tried in place next. I have allowed a little bit more clearance on this model than some of my previous ones, so the chassis will seem loose. This is because the Fine Detailed plastic is less flexible and would break if put under too much pressure. The use of a small piece of Blu Tack at each end of the chassis footplate will take this tolerance up.

©  2018   David Hurst     All  Rights Reserved
I found it easier to paint the small detailed parts before fitting them to the model. It also made the body and footplate much more accessible to paint in detail. I used Revel 09 charcoal on the chassis and a light blue mix on the bodywork. The cab interior had a thinned wash of a cream mix which included the brake column and driver’s seat. The buffer beams and axle boxes had a wash of bright red over the grey primer so that the grey showed through. I did not want the paint to look new but worn. I added rust streaks down various parts of the body work, from the corners of window and bonnet doors hinges and the radiator brackets. Soot and grime were added using a black and brown thinned wash applied with a dry brush, which helped to pick out areas like the side and front grills. Bare metal and metal components were picked out with a mixture of dark grey and silver (gunmetal). To finish the whole model was given a coat of satin varnish.

©  2018   David Hurst     All  Rights Reserved
The ballast was added to the model wherever I could find space, some each end of the foot plate and some centrally over the chassis. I could have but more in the front of the body behind the radiator but that would make the model imbalanced.

©  2018   David Hurst     All  Rights Reserved
I found it difficult to find a driver for this particular little engine because of the seated and twisted position the figure would need to take. So I found a suitable Dapold line side figure and adjusted its posture to seating with arms out and head turned to the left. As these figures are on the tall side the loss of a bit of height did not seem to look out of place. 

©  2018   David Hurst     All  Rights Reserved

©  2018   David Hurst     All  Rights Reserved

    
If you would like a copy of this model it is available on Shapeways at Model Engine Works:


Friday, 22 December 2017

009 Tram Coach


Additional notes added August 2019


©  2017   David Hurst     All  Rights Reserved
This is a small tram-style coach based on the Clogher Valley Railways coaches but without the clerestory roof.
The original Clogher Valley coaches were built in 1886 by The Metropolitan Railway Carriage and Wagon Co of Birmingham. There were 13 passenger coaches in total, numbers 7-9 bogie 1st class which were shorter than the others, 10 & 11 bogie 1st / 3rd composite, 12 – 19 bogie 3rd. All the coaches had balconies at each end, which supported the overhanging clerestory style roof. Communication between each coach was possible across metal fall-plates which covered the buffer-couplings. The carriages were innovative in using exhaust steam to provide heat to their passengers, at a time when the best most people could expect in winter was a warming pan. The coaches remained in service till the lines closure on New Year’s Day 1942.  

©  2017   David Hurst     All  Rights Reserved
The print configuration in two halves cuts down the amount of support material by a considerable amount and therefore the cost. It still allows for the fitting of internal details and glazing before the coach is assembled. It is also much easier to add details such as the etched mesh to the balcony end frames from the inside before they are added to the main coachwork.
Because of the detailed panel-work on these coaches they are only available to print in Frosted Ultra Detail, this does mean that the balcony end frames are quite delicate and I have found that they may warp in transit. Fixing them into position on the model does push them back into their correct shape, but be gentle as this is done.

©  2017   David Hurst     All  Rights Reserved
 I have found it a good move to keep all of the print in one piece while you remove the waxy residue, wash and prime the print. I used a mid-grey spray primer and, once dry, the etched mesh was added to the balcony ends. I had a small diamond etch that I had bought at a local railway exhibition, which I cut down to suit the small end frames at each side of the balconies. These were fixed on the inside of the balcony using Cyanoacrylate glue (super glue). A final coat of primer was sprayed over the whole print and allowed to dry. 

©  2017   David Hurst     All  Rights Reserved

I decided to use a pair of Kato 11-099 bogies on this coach as they have an offset pivot, are small well engineered and have a free running wheel sets. The offset pivot on the bogie was particularly useful as it allowed the pivot on the floor of the coach to be close to the balcony steps without the bogie being restricted by them. This does mean that they are the wrong way round, the couplings facing inward, and should be removed. I felt that this would not be of any detriment as the coach    itself is short, and normal fixed coupling should cope on restricted curves. I did find that the pivot formed by the printer can vary in the thickness. This stops the free movement of the bogie from side to side. I used a small flat file to dress off some access material at the base of the pivot on the coach, which will allow the pivot clips on the bogie to engage on the inside of the pivot hole on the bottom of the coach and allow it to turn freely.   
My choice of finish was a Revel oil based paint ref SM 331 thinned slightly and I applied two coats of this to the sides, ends and the balcony ends. The frames and steps had a coat of dark grey Revel mat 9, the fall plates were a mix of the matt 9 and a silver to create a dark gunmetal finish. A wood colour mix was used on the balcony floors, and on the roof I used a Revel light grey matt 43 and white 5 mix. I left the inside of the coach in the light grey primer finish as this is pretty neutral.

©  2017   David Hurst     All  Rights Reserved
After the painting was completed, the glazing could be added with a sheet of clear acetate cut to suit the side windows, then glued in place with Cyanoacrylate glue (super glue). I found it simplest to position the glazing panels and then drop some glue on the edges, this would then run under the acetate and fix it in place. Apply a little light pressure while the glue is going off.
©  2017   David Hurst     All  Rights Reserved
When you are assembling the coach the central roof joint will be the most obvious and this can be tackled in a few ways. One is to fill the joint after fixing the coach together and painting over the joint. Another method is to use a single lamination of toilet tissue paper to represent a felt roof covering: fill the roof joint, apply glue over the whole roof, then add the paper from the centre line letting the glue soak in as it is applied. Once the result has dried this can be painted, possibly in a dark grey to mimic the felt colour. The two roof ventilators are then added and finished in with the roof colouring.    
Numbers were added to each side of this particular coach. The central panel was used to display the number 10, the three panels under the windows being a good area to display numbering or lettering. Any style of around 1 to 2mm size will look fine.  I used the Fox Transfers FG1003 - Alphabet in white - Franklin Heavy, 2mm & 1mm which give a nice bold graphic.

©  2017   David Hurst     All  Rights Reserved
Once fully assembled – couplings added, glazing and painting fully completed- a coat of thinned matt or satin varnish was applied to all painted areas of the model. This helps to fix the transfers and pull the whole finish together. It is a bit of a personal choice, but I do like to add a measure of weathering to the final model. It removes that out- of- the box look. To do this I use artist’s oil pastels which have been made into a powder form. Black, burnt senna (earth/mid brown), light red and orange are the main colour pallet that I use.  It is also quite easy to mix these to create other shades. They are dusted on the model with a number 6 size paint brush that is kept specifically for this job. If you don’t like what you have done it can be cleaned off again, which is what I like about using oil pastel dust to do the weathering.   
©  2017   David Hurst     All  Rights Reserved
If you would like a copy of this model visit Model Engine Works at:

Additional notes added August 2019

Further variants of this style of coach are available from the Model Engine Works Shop on Shapeways. Both are slightly smaller and more economical to build. One comes with a clerestory roof like the original Clogher Valley coaches. The other has no roof printed, allowing you to supply your own. They both have window openers which can be positioned as you require. Roof vents are also supplied to add the finishing touch to the roof.

©  2019   David Hurst     All  Rights Reserved

©  2019   David Hurst     All  Rights Reserved

Further items will be need to complete the models, these include wagon chassis such as the Peco N" gauge chassis kits (Ref NR122 0r NR123) from Dundas Models. A set of couplings and acetate or clear Plasticard for glazing the windows.

©  2019   David Hurst     All  Rights Reserved


If you would like a copy of this model visit Model Engine Works at: