Showing posts with label 0-4-2. Show all posts

Sunday, 10 March 2019

009 Skylark Style Engine


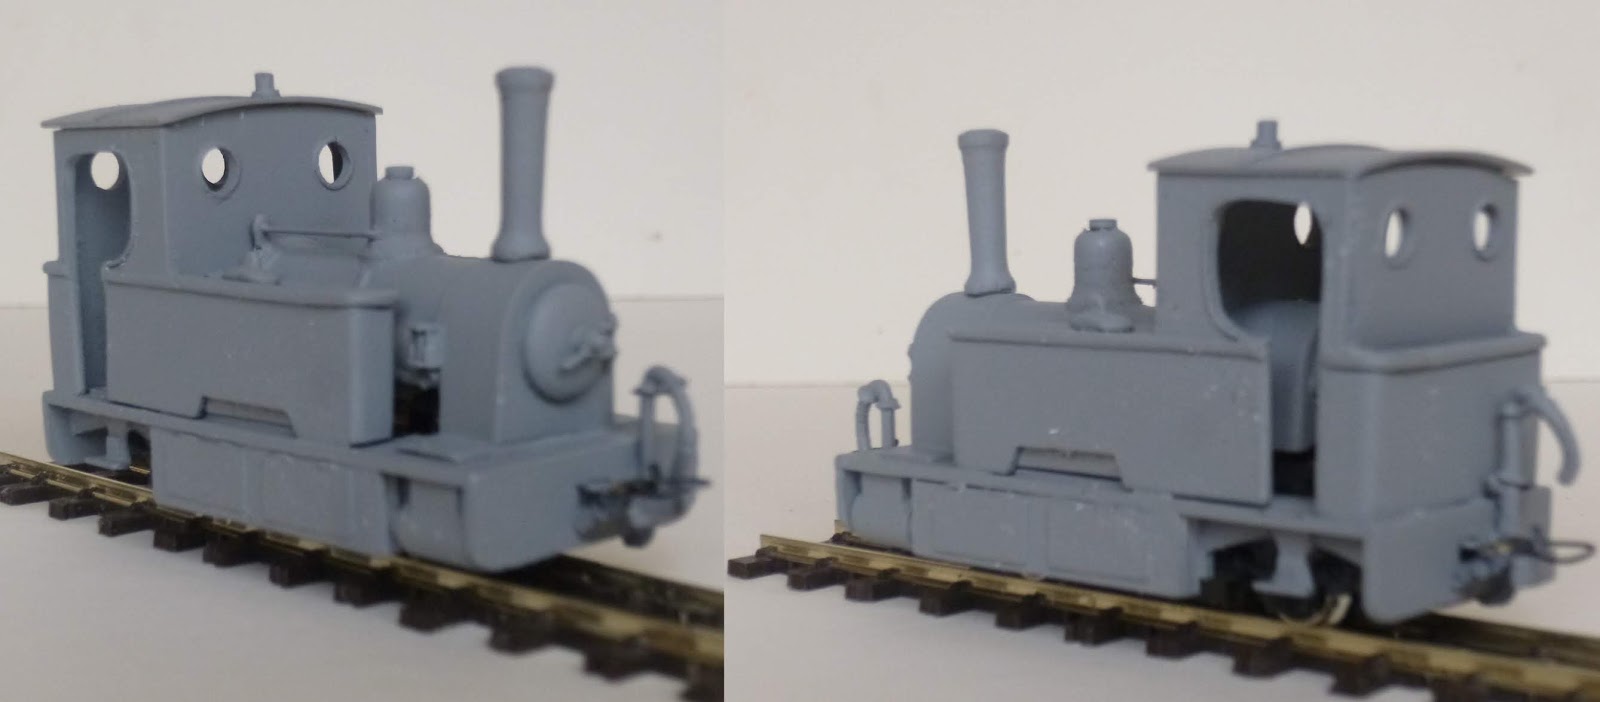
3D print of this engine is now available at Model Engine Works on Shapeways.


©  2019   David Hurst     All  Rights Reserved

One small engine which a lot of people seem to have on their layouts is the Kerr Stuart 0-4-2 Skylark. Most use the white metal kit and a chassis such as the Ndrive 0-4-0 with a pony wheel added. I was impressed by the one built by Michael Campbell using the Kato chassis with side plates which mimicked the pony wheel with the rear wheel of the Kato chassis, a simple but really good solution. http://michaelsrailways.blogspot.co.uk/2012/10/a-little-bit-of-skirt.html

©  2019   David Hurst     All  Rights Reserved

I decided to have a go at scratch building my own version of the Skylark. As I was looking to build something in this style rather than recreating the actual engine, there were possibilities to make a few changes to the model and still keep the look and spirit of that style of engine.
I got as many reference pictures as I could find together and also one of the Kato 11-104 chassis. 

©  2019   David Hurst     All  Rights Reserved

These are very good when getting into modelling 009 narrow gauge engines as they are so reliable and inexpensive. These can be used on engines that are made with side plates, which were usual on roadside tramways built in the UK and Ireland.
I started by making a mock-up footplate, to get the right-sized opening to fit the chassis. Once I had that sorted I made a few scale drawings of the bodywork, using the pictures as guidance.

©  2019   David Hurst     All  Rights Reserved

My plan was to build the engine from different thickness of sheet Plasticard and spare pieces from old model kits that had been left over. 
To make the body I printed some paper patterns from the drawings that I had made, which were temporally fixed to various thickness of Plasticard with Pritt stick. This holds them long enough to cut out and the paper then just peels off afterwards.
The smoke box having a round top was formed using 1mm front and back shaped pieces fixed to the rectangular base. Then thin sheet Plasticard was formed over this in two layers. This is easy to bend to shape and by gluing the additional layer strengthens it up. The same idea was used on the boiler, with an additional layer being used to create the bands around the boiler. Of course if you have the right size tube this will save going to the trouble of making the boiler.
The chimney and dome were made using lime wood and turned in the chuck of a small electric drill.

©  2019   David Hurst     All  Rights Reserved


If I had known about the “Gem 9104” white metal OO-9/ industrial loco fittings beforehand I would have used one of these chimneys and the dome.

The smoke box door was made up of two discs of 1 mm Plasticard sanded to shape, the hinges and handles were added using spare bits from an Airfix 040 saddle tank kit.I formed the spectacle windows by drilling an oversized hole and lining this with strips of thin Plasticard sheet to give the impression of a brass frame when painted. I made use of a pair of vacuum pipes from a spare Vale of Rheidol coach.  
 
©  2019   David Hurst     All  Rights Reserved


The upper edges to the water tanks have a strip of the Plasticard added round the top  and this is then filed to a D shape with the top inner edge softened, which forms a slight well at the top of the two side tanks.
I used one of the Dapol track side figures for the crew. I did find that I had to shorten the legs on this figure as in general they are slightly over size in some of the smaller engines.  

©  2019   David Hurst     All  Rights Reserved

I made the lamps in bulk some time ago using white 1 mm thick plasticard rectangles to form a 3 x 2 x 2mm block and then added a 2mm disk on top, and for the lenses I used a small 2mm clear or red rhinestone. 
The paint was a mixture of various Humbrol colours to produce a shade of maroon that I liked. A final coat of matt was added to the footplate and smoke box, then satin varnish over the maroon painted areas. I used real crushed coal in the bunker – you need to get this almost like dust at this scale to look right.

©  2019   David Hurst     All  Rights Reserved

The finishing touch was a set of name and works plates from Narrow Planet who do the brass etched plates to order. “Fergus” was my chosen name with a separate set of works plates.

©  2019   David Hurst     All  Rights Reserved

 It has been a good practice run for me and I have enjoyed the challenge of the build.


This popular little engine is now available as a 3D print to run on the readily available Kato 11-104 chassis. It has separate foot plate body and roof to allow for interior details to be added, there are also a pair of simple couplings printed under the foot plate of the model.
Additional details will be needed to complete the model as show, these include smoke box door handles, cab side handrails and working lamps.

©  2019   David Hurst     All  Rights Reserved

If you would like a 3D print of this model visit Shapeways at:


Friday, 16 November 2018

009 Tattoo Class 0 4 2

 A venture into white metal kit building.
©  2018   David Hurst     All  Rights Reserved

The Kerr Stuart “Tattoo Class” is a favourite of mine and I have built quite a few models based around this type of engine. They were built by Kerr Stuart & Co in large numbers at the beginning of the 1900’s as a small workhorse engine, the majority being for 2 ft gauge lines and having outside frames, to accommodate the firebox. There were however quite a few built for wider gauges 2ft 6” and 3ft with inside frames. Being a basic engine, most had open cabs, though some had enclosed cabs added in different forms at the time of manufacture, or later by their owners. 

©  2018   David Hurst     All  Rights Reserved

A Christmas gift I once received was a white metal version of the Talyllyn Railway’s engine Edward Thomas. I had also had an Ndrive Productions 0 4 0 Chassis which was a suitable size to fit the kit, needing only the addition of a rear pony wheel. The spark that prompted me to finally build the model was a holiday in mid Wales, where I planned to visit the Talyllyn Railway and perhaps see Edward Thomas in person. 

©  2018   David Hurst     All  Rights Reserved

I started by looking for the right candidate for a pony wheel, which needed to be around 5.3 mm. There was also the question of how to mount the wheel onto the chassis. Now Ndrive Productions (Neville) has a nifty little etched universal mount to do this job, a cross with several holes to fit the wheels and create a pivot. The only thing was that you needed a wheel set that separates from the axles (to pass through the holes in the pony truck etch). 
 
                                                         ©  2018   David Hurst     All  Rights Reserved
I discovered that the Kato wheel sets are held together with a plastic tube (to electrically insulate the wheels) and are close to the right size for the pony wheel. By filing off the pinpoint bearing and carefully opening out the hole in the etch I had a basic pony wheel and mount. Having selected the suitable pivot hole on the etch, it was then a fiddly job to drill a small very accurate hole to take a 10 BA cheese head machine screw in the base of the chassis. Care is needed as you are working very close to the gears, (so don’t slip)?

This pony wheel assembly is very light and does not ride on the track well in reverse, although its wheels are free moving and it pivots easily. The etch being a cross shaped form does give the opportunity to add a little weight at the back of the wheels. The 10 BA cheese head needed to be filed down to a thin disk with a new slot cut across it, to avoid catching on the track at points. It was also necessary to file down the wheel pick-ups at the back of the chassis or the etch for the pony wheel would not pass over these.
The other areas of the chassis that needed to be fettled were above and in front the cylinders. These needed to be filed off and cut to allow the chassis to sit tightly up to the underside of the footplate. Also, the width of the rear bar needed reducing at both sides.

©  2018   David Hurst     All  Rights Reserved

To say that this kit was designed for another type of chassis, it was a surprisingly good fit. There was a small area for the cab front and underside of the boiler to remove to accommodate the slightly bigger motor, a few tweaks to the footplate at the front a small square to cut out for the worm gear, and that was it. The body and the chassis were held together by forming a small L shaped bracket at the back and glueing this to the underside of the cab, this formed a channel for the rear of the chassis to hook into.

©  2018   David Hurst     All  Rights Reserved

The front fixing of the bodywork uses the existing counter-sunk machine screw and nut supplied with the chassis. This was done by slightly deepening the counter sink in the chassis and glueing the nut to the top face of the footplate situated above the existing hole. All of this was done before the bulk of the model was put together. I also added the blast under the saddle tank and in the smoke box before final assembly. It needed more weight at the front to counter the overhang of the cab, and partly to reduce this weight. I did not use the cab roof since this appeared too thick and bulky ,but instead formed one in Plasticard sheet, creating the gutters which the metal roof lacked.
Other modifications to the model included adding brass 0.45 mm wire handrails to the cab sides and above the smoke box. Also water feed pipe work under the saddle tank was added to hide the cogs and worm gear.  The shape of the cylinders was changed by using some Plasticard sheet to make them look more like the prototype. The buffers were not used on this model, only the supplied coupling plus some lamps and tool boxes.

©  2018   David Hurst     All  Rights Reserved

Paintwork on this model was completed when it was fully assembled, apart from the cab roof which was left loose to allow the cab interior to be finished. To prime the metal and plastic structure I used a matt grey spray primer suitable for metal and plastic surfaces. The finishing paints where oil-based enamels. The green used was a mix of deep Brunswick green and light grey green. The black areas were a mix of matt black on the smoke box and funnel, the other areas being painted in a charcoal grey. I used a signal red on the buffer beams, whilst inside the cab was left in the grey primer finish. Small details such as pipework and safety valves were picked out in a brass metallic finish. The whole model was finished in either a matt varnish or satin clear varnish once details such as the works plates and name plates were fitted.

©  2018   David Hurst     All  Rights Reserved

The set of etched brass plates were supplied by Narrow Planet, who produce a set specifically for “Edward Thomas” from the Talyllyn Railway.     

©  2018   David Hurst     All  Rights Reserved

The engine crew was an adapted Dapol Line side work crew figure , with one leg shortened to suit the height of the footplate whilst still looking like a 4 mm scale figure. 


Sunday, 11 October 2015

Sharp Stewart 0 4 2

Looking around there are many really good model tram engines but some just stand out from the crowd. Such is the case for me with the numerous models of the Clougher Valley railways original engines, the 0 4 2 Sharp Stuarts, captured so well by Paul Windle’s reduced size version.It took me a while to discover where the original of this engine came from, I eventually came across a picture of it on the Belfast Telegraph’s archives, pointing me to the Clougher Valley railway as its home. I now have a treasured copy of The Clougher Valley Railway by E.M.Patterson which is a brilliant source of information about this tramway / railway.


Having just completed a course to learn 3D Cad I was advised to practice on a subject I would enjoy, so what better subject than this engine. I decided to work on a compact version to fit a Kato 11-104 chassis, and this was the first thing I drew up since I could use this chassis drawing on other projects as well.


Cad file of 0 4 2 Sharp Stuart 


The whole process was an interesting challenge as I was planning to use 3D printing to produce the model, a process which meant a lot of reading to find out about the different material available.
My final choice of plastic was an acrylic which would provide me with fine detail; I had selected two suppliers to try, one being Shapeways and the other CWrailways   http://www.cwrailways.com . My first attempt was sent to Shapeways, which was a single piece body and had quite a few drawbacks. Access to get detail and crew into the cab was one, I should have made the roof separate. The other was that areas of the body shell were too thin, which showed up as the acrylic is very brittle and easily damaged. A corner of the roof overhang broke off, so I added a further layer of thin plastic card to the top surface. The funnel was elegant but far too thin, I ended up cutting it off and adding a Gem white metal one. Also the bottom edges of the tram skirts were thin and seemed pretty fragile, so again I did a bit of reinforcing with plasticard.
By the time I got round to ordering my second prototype I had completed the first one. I finished it in Brunswick green and named the engine Erne No 6 after one of the Clougher Valley railway originals. 


With modifications done to the drawing of the second prototype, I sent the STL file of to Chris at CWrailways who had kindly advised on some changes to the model. When this second model had been printed it was more robust and I was pleased with the results. There were a few little niggling issues that prompted a return to the drawing board, but these were tweaks not major things.
  

With the body shell form CWrailways there is no need to remove the support wax residue.  Unlike the Shapeways version, you can rub over the surface with a wood lolly stick or similar tool with rounded edges, and this helps to remove the layer effect evident on the model’s surface. A good two or three thin coats of spray primer will level the surface ready for the final brush or spray finish.   
Once the first coat of primer was added to the body and any blemishes to the surface corrected, I then added hand rails and other details. The hand rails I used were from Mainly Trains  http://www.mainlytrains.co.uk/ ; the make was Gibson, which uses 0.45mm brass wire and some really small brass handrail knobs, one of the short versions of these were used on this engine. They are fiddly to handle but look very much to scale.


I made the head lamps at this stage using 3 disks of 1 mm thick plasticard to form the body and two small squares fitted top and bottom to give the lamp its distinctive shape. These are the later acetylene lamps used on the C.V.R. The lenses were formed by using a suitable sized drill bit and forming a concave shape hollow in the face of the lamp, which was then lined with aluminium foil shiny side outward. The lamp was then painted matt black and left to fit to the cab between the windows after painting was completed.


It is necessary to cut down the Kato 11-104 chassis. The cuts are made at both ends just at the outside of the fixing screws holding the unit together, you will need to file a bit of the metal base back to this point also. A couple of little bits of lead strip were added at each end of the chassis just under the fixings.


The only other ballast I added to the second engine was two pieces down the inside of each skirt. The first engine had the lead fitted to the inside of each water tank and under the coal bunker. Both run well with the weight added.


I cut some clear plasticard for the cab windows which was much easier to fit with no roof on the cab and this was not glued in place until the paintwork was completed. A suitable figure was selected from the Dapol range of trackside workmen, adjusted to take up a relaxed stance in the cab and painted. This was then put aside to be added with the glazing when painting of the body was finished.

The final addition to the shell was Peco NEM coupler pockets. These are glued together which is easier when they are whole. A small strip of 0.5 mm plasticard was used to locate the pockets in the correct position so they did not stick out too much on the face of the body, (but this is personal choice). They were then cut down from the Z shape to form an L shape, this being necessary because of the limited space I have allowed for the chassis.


As mentioned earlier I added three thin coats of primer to this model, the finishing coats were applied by spray and brush. Starting with the red on the cowcatcher and the area around the front coupling, I have a red spray paint purchased from Aldi which gives a good bright red finish. The body and foot plate requires masking off well when using this, and I also use masking fluid in the areas around the cylinders and coupler pockets. 


Once a couple of coats of this was applied I moved on to the main bodywork, for which I used Revell SM331 which is similar to Crimson Lake. The black areas round the skirts, smoke box and cab roof were finished with Hunbrol Matt black 33.
The finishing touches round the windows and safety valves are in Hunbrol metallic bronze. It is usually a good bet to leave the model for a few days after painting the top coats, as particularly on the Shapeways body shells there always seems to be a slight reaction to the carrier wax residue, and the paint stays soft. When I am quite happy that the paint has cured I add the cab glazing and crew, then fix the roof in place.
The engine name and number are added next using Model master water slide transfers. An ark cut from masking tape is used as guide to get the individual letters of the name to form a curve. 


When these have dried overnight I apply a coat of matt varnish, usually Humbrol enamel brushed or acrylic spray.


The final touch is to add the coal. This is done using PVA wood glue and crushed real coal. The coal bunker is filled with the PVA and the coal pieces added using a small piece of tube sliced back at an angle to form a scoop. This gives me a bit of control where the coal is going.  


This model has opened up all sorts for possibilities for me, Ideas are there and I am hoping to draw up a few more and print them.

If you would like to obtain a copy of the 3D print it is available at.
https://www.shapeways.com/product/TYBBEH7A6/009-irish-tram-engine?li=shop-results&optionId=57962544&rc=SearchResults
http://www.cwrailways.com/009-ng.html

009 Tram engine 2

Having been ask to create a version of this little tram engine to suit a Hallings 12 mm chassis for HOm12 gauge, I found that the new larger engine also suited the Kato 11-103 chassis, and it is this version which I have made here see pictures below.


I have had a prototype printed in FUD, and would be confident that it should print in SWF as well, as its smaller twin dose


http://www.shapeways.com/product/KSK5TV4JJ/?key=f5755833c042d20fc32b50583926515c&optionId=60192392