
 |
© 2020
David Hurst All Rights Reserved
|
This is a “what might have been” Fowler style steam
tram engine, based on a Fowler traction engine’s boiler and funnel, the cab of a steam wagon, assembled on a footplate to go on rails. The result is a reverse running engine cab
first with a large forward facing lamp, but it looks equally well as a small engine with a high
mounted boiler and oval cab windows running forward. It would probably be used
in various industrial settings or on small roadside tramways around the latter
part of the 1800s.
 |
© 2020
David Hurst All Rights Reserved
|
I had a sample printed by Shapeways in Fine Detailed
Plastic. When this arrived, I soaked it in Petroleum organic solvent –
paint thinners (“White Sprits” in the UK) in order to remove the wax support
residue left from printing, then I washed it in warm soapy water this should be left to fully dried before painting. I then used a grey spray
primer to prep the model for finishing. In some areas, it may be necessary with some models to remove print lines from the surface, and this can be done with a burnishing
tool - I use a hardwood stick with a rounded point to get in the tight spaces.
Do these processes before separating the print into its component parts so you
will be less likely to lose any of the small pieces.
Wirework and details
The next job was to add the handrails to the side of the
cab. I obtained the wire for these from a supplier on eBay. I formed the cab side handrails as small staples bent with pliers to the right size and
fitted into the pilot holes supplied on the model. The handrails were then
glued in place with Cyanoacrylate (super) glue.
The smokebox on the model is a simple top-hinged affair so
no dart will be needed.
The new Kato 11-110 chassis are a welcome improvement on
the later version of the 11-104 which they replace, having more weight,
different gearing, a brass flywheel and much smoother electric motor. They fit
within a similar opening as the original. They do not need as much ballast to
run well, but adding some is a good idea for traction. I used small strips of
lead fitted along the inside of the skirts, also on the sides of the water
tanks keeping this as low as possible to keep the engine's centre of balance as low as possible.
 |
© 2020
David Hurst All Rights Reserved
|
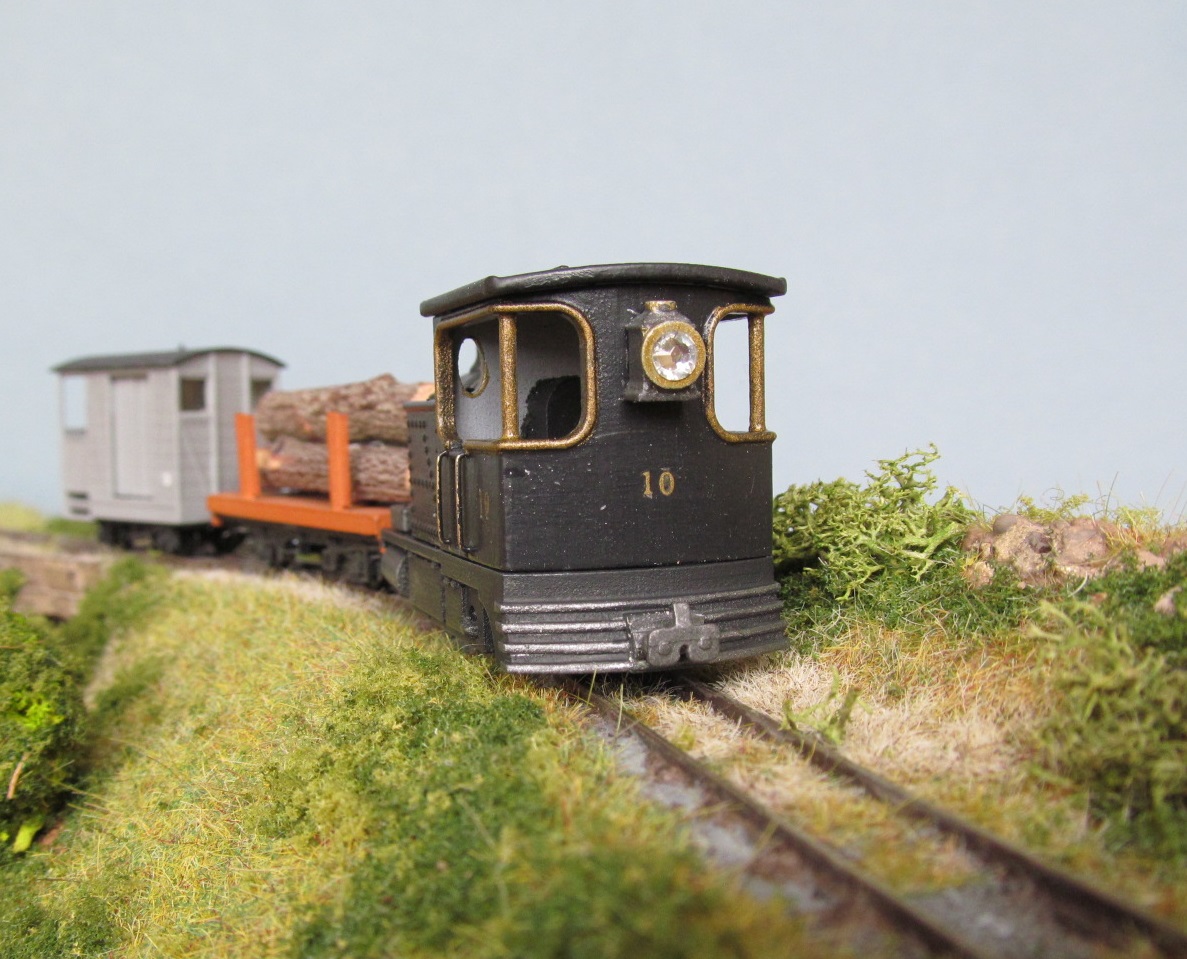
The couplings I used on this model were from RT Models ref 4NLP005 white metal Penryhn Locomotive couplings. Others could be fitted such as
Greenwich or NEM couplings. The aperture in the buffer beams will take the Peco
103 NEM pockets and couplings.
Painting and finishing
Once all the additional bits and details were added I gave
the model a final coat of grey spray primer and made sure all was ready of the
final paint finish. For this model I was trying some Tamiya acrylic paints, I
had decided this was going to be an industrial-looking model and finished in
black, so I used the XF-85 Rubber Black on everything except the front buffer
beam, which I used XF-7 Flat Red. Using these I noticed that each colour has a
different consistency, the XF-7 being thin and needing several coats were as
the XF-85 was smoother, creamer, and needed fewer coats. I picked out some details like the
window frames in a brass enamel paint and the cab handrails I
left in the brass wire to match. The cylinders, couplings, lamp, and smokebox door were
painted in a gunmetal metallic enamel paint.
I wanted to add numbers transfers to the model so I applied
a coat of clear gloss enamel varnish to the areas these were to be placed. This
is a better surface to apply the transfers to and allows you to adjust and
position them much easier. I used “Fox” 2mm waterslide transfers in gold for
the cab sides and rear only. Once this was completed, I applied a coat of matt
enamel varnish to the whole surface of the model, this also seals the transfers
in place.
 |
© 2020
David Hurst All Rights Reserved
|
The final additions to the model were to add some real
crushed coal to the two bunkers at the rear of the water tank next to the cab,
by adding PVA glue to the bunker area and then tipping a small amount of the
coal over this using a tube as a micro shovel to place it correctly.
 |
© 2020
David Hurst All Rights Reserved
|
In
the past I have made some working lamps from white Plasticard and rhinestones of clear
and red plastic and I used one of these for the rear running lamp for this
engine and a larger rhinestone for the large lamp on the cab.
 |
© 2020
David Hurst All Rights Reserved
|
 |
© 2020
David Hurst All Rights Reserved
|
If you would like a 3D print of this model
visit Shapeways at:
https://www.shapeways.com/product/QZZ3HCYNZ/009-fowler-style-tram-engine?optionId=118835606&li=shops