
Updated 2020
Recently, while looking through old pictures on the internet for “The Clogher Valley Railway”, I happened across a picture of a really nice looking little railcar. Although this was not officially used on the C.V.R - merely lent by the County Donegal railway as a trial - it did not look out of place. This was the Donegal railcar No 4, one of eight that the enthusiastic Henry Forbes had introduced on the C.D.R. in the early 1930s. After further searches, I came across some really good drawings of this railcar done by JDW drawing services from New Zealand.
Recently, while looking through old pictures on the internet for “The Clogher Valley Railway”, I happened across a picture of a really nice looking little railcar. Although this was not officially used on the C.V.R - merely lent by the County Donegal railway as a trial - it did not look out of place. This was the Donegal railcar No 4, one of eight that the enthusiastic Henry Forbes had introduced on the C.D.R. in the early 1930s. After further searches, I came across some really good drawings of this railcar done by JDW drawing services from New Zealand.

These gave me the spur to draw up my own version in 009 gauge. I considered the type of chassis I was going to use, having a couple of Kato 11-104’s in my bit box. These looked about the right wheel size, and the spacing looked roughly in proportion, although the wheels would be a little further back than they were in the original. I stripped the weight off the bottom of the chassis so it looked a bit less bulky, and this did not affect the running as long as other weights were added elsewhere. Based on this idea, I did a Cad 3D drawing of the railcar bodywork and after uploading this onto the Shapeways site and proofing the structure for printing in various materials I had, with a bit of redrawing, something to work with. I went ahead and had it printed in the Frosted Ultra detail since I had added quite a bit of fine detail to the windows and coachwork round the body, which I wanted to show up clearly.

A couple of weeks later a Shapeways box turned up, and I was very pleased with the results. This was my second attempt at design and printing in 3D. I had designed the front of the bodywork behind the radiator to hook over the front of the Kato chassis. I was intending to remove the front clips used to hold the chassis in place, which were right in front of the forward bulkhead and looked out of place (see Cad drawing). I noticed that I had left part of the forward bulkhead under the bonnet obstructing the chassis, so this had to be removed. Once I had adjusted the chassis by cutting the end balcony’s off, trimming the front clips back to the base top, and removing the two small pins which are at the back of the couplings from both ends the chassis it was ready to put in place. The only thing which I had not allowed sufficient space for was the green capacitor, so I had to drill a hole between the seats to allow for this. I found the rear clips were a bit too strong to allow me to get the chassis in and out with ease, so I filed these down a little so they were more rounded than angular, which worked.

Using some lead flashing as ballast, this was cut into small weights which fitted between the chassis mounting plate and the railcar floor. The chassis traps this in place when fitted. In addition to these, I also added a small piece inside the cabin in front of the seats and behind the doors. This was needed to get the wheels to pick up current and run smoothly. It is best to have a dry run with the ballast and any interior fit out at this stage before painting.

The design is in two parts: the roof is separate with 6 small lugs to position it onto the main body, which allows the fitting of glazing after painting and also the cabin can be populated by some people if you wish.

With the Frosted Ultra detail, you need to get rid of the wax residue before paint is added. I tackle this with a wash in white spirits and then a good wash in hot soapy water. It is best to dry it off in the airing cupboard overnight if you still have one of these.

I used Plastikote grey primer to give the base coat to the paintwork, but any good primer should do the job. With a light rubdown with some ‘wet and dry’ between coats and before the final colour is added. As I am using a light cream colour, I added a further base coat of matt off-white.

Any visible areas of the chassis round the front I painted matt black, and with the capacitor now exposed I added some masking tape above this, which was also finished in the matt black.

My intention is to do the floor area in a matt black. This should give a false impression of depth where there is none.
When painting the railcar I decided to opt for a cross between the Donegal colour scheme of the red lower body and cream upper round windows with a light grey / white roof and the Clogher crimson lake / reddish brown for coaches and railcars. I used the Donegal placement of colour but used a deeper reddish / burgundy Humbrol matt 73 on the lower body, with cream round the windows; this will be a 1:2 mix of Humbrol cream matt 103 and white matt 34 and a light grey roof. I have some coaches done in a similar livery so this will fit in.
Once painted, I added the glazing in clear Plasticard sheet cut to suit each section of windows. The front screen and the doors needed mitring on the inside face, but trapped each other in place and a small spot of contact adhesive fixes these in position. The seats at the side of the coach have a small depression at the top near the windows to rest the glazing in so that they only need fixing at the top. I cut a full height panel for the back window, which was then bonded at the bottom on the floor and in the top corners.

At this stage, the figures are added, and I have used a selection of the Dapol station and trackside “torsos” to fill some of the seating plus a driver. They are held in place with a spot of contact adhesive.
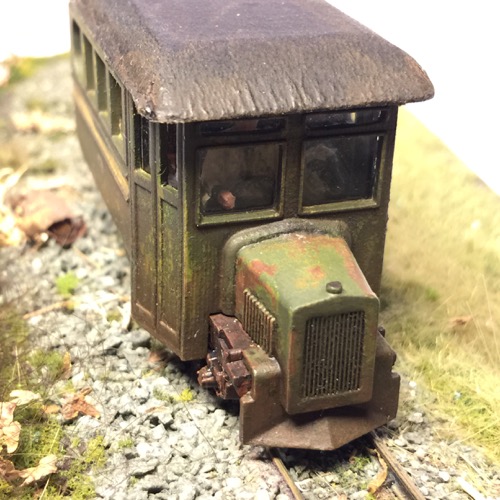
To complete the front of the railcar, I have added a single headlamp on an extended frame from below the side of the radiator, which holds the lamp in a position at the top of the radiator. This was made from some 40th plasticard discs which I made using a hole punch. This was glued together and drilled with a 0.5 hole to take some 0.45 mm brass wire, which was passed through and bent to form the bracket. To give the lens some sparkle I added a small 2mm clear rhinestone to the front and painted the lamp body and bracket black.

The radiator was painted in a mix of Humbrol Met 56 silver and satin black 85 to give a less shiny and more gunmetal effect. I then dry brushed over the grill with this same mix to pick out the vertical slats.


I decided to give the railcar a number only at this stage which was applied using some Talyllyn coach numbers to the sides. No 6 is my chosen number for this railcar. I then added a top coat of satin varnish over the matt paintwork and the transfers.

It has been an enjoyable challenge to create this little railcar and it will now join my mini 3D printed version of the Sharp Stewart engine, also running on the reliable Kato chassis.
Since writing this blog I have seen a number of other modellers versions of this little railcar. Simon
Cox has kindly allowed me to show some pictures of his take on the railcar. A rustic
version that not only carries people but their livestock as well. Details of Simon’s
build can be seen on the “Narrow Gauge Railway Modelling Online” forums under, (Simon-Coxs-workbench).
A brilliant job Simon.
 |
| By Simon Cox |
 |
| By Simon Cox |
 |
| By Simon Cox |
Further developments 2017 and updated 2020 to suit the new Kato 11-110 chassis
 |
| © 2017 David Hurst All Rights Reserved |
This is a similar small 009 Railcar to my earlier Donegal Irish Railcar but slightly increased in size and with additional features and design changes. It is again designed to work on the Kato 11-104 or 11-110 chassis with modification. I have designed this model to print in White Versatile Plastic. It has also been made available to print in Smooth Fine Detailed Plastic.
 |
| © 2017 David Hurst All Rights Reserved |
The roof is removable to allow for the addition of internal details such as glazing and figures and there is also a rear ladder for access to the roof luggage rack. The roof profile reflects the original Donegal No 4’s, with a central lamp added to the front. Also, representations of the slashers - mudguards have been added above the front wheels.

Alterations to the Kato 11-110 chassis to suit this rail car body.
1 The forward part of the plastic casing will need to be cut off. If the plastic shell is removed from the chassis this is easier to do. it should be the front section with the small arrow. A razer saw will do this.
2 Some of the metal casing to the chassis needs to be removed, this can only be done at the front of the chassis. A razer saw or small cutting disk will remove the front section, then a small file can be used to shape the sides.

A small packer of 0.5mm may be needed at the top of the plastic casing to the floor of the
model to position the chassis height correctly.
 |
© 2020
David Hurst All Rights Reserved
|
Love this railcar David - you have done a superb job. I had to buy one myself!
ReplyDeleteSimon
DeleteThank you for your generous comments, it’s amazed me how popular this railcar has been, it would be good to see you’re finished model.
Regards,
David Hurst
Nice car, I have two Kato 11-105 chassis coming for two projects; one being a scratch build railcar. Do you know if the 105 will fit this kit?
ReplyDeleteHello there thanks for getting in touch, I have one of the Kato-105 chassis, It would possibly work if fitted right up to the back of the railcar and remove some of the black plastic lower foot plate. good luck with the project.
ReplyDeleteRegards,
D Hurst
Hi
ReplyDeleteDo you think it would be possible to fit a DCC decoder to this kit.
Hi
ReplyDeleteI love this railcar.
Two questions:
1) Where do you buy the transfer on the side (company logo; see your last picture) ?
2) The numero of the railcar (No 4) is a relief No ? Where to find it ?
Congratulations and best regards from Switzerland (sorry for bad english)
I purchased this Railcar many years ago and was really pleased with it. Just wondered if it was still available as I would like to run it back to back with the original one as a trailer on a dummy chassis.
ReplyDelete